Showing posts with label Easter. Show all posts

Sunday, April 24, 2011

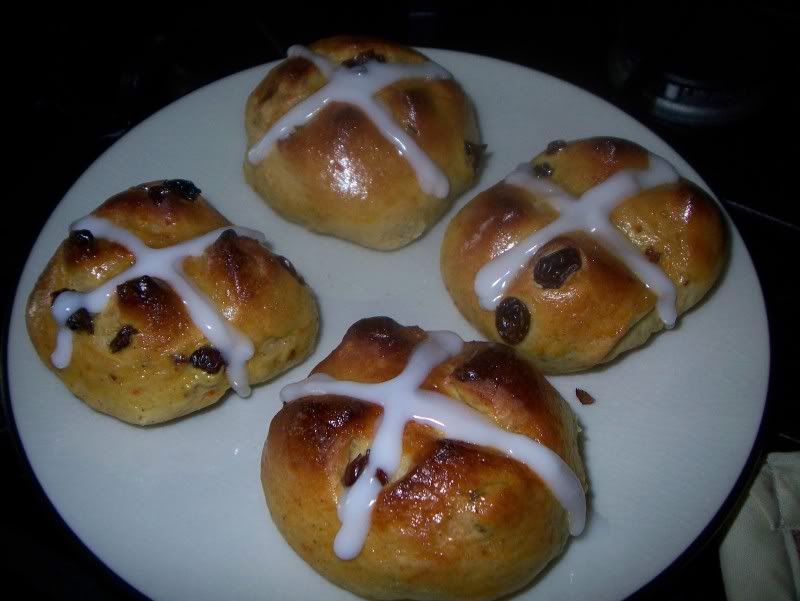
Hot Cross Buns

Happy Easter Y'All!


I hope you have a wonderful day with you friends, family and loved ones! I plan on sitting down to a meal of ham, sweet potato casserole, corn pudding and green beans - and more desesrts than I know what to do with!


Today, I'm going to keep the post short, as I want to spend as much time as I can with my parents, who drove all the way from the East Coast to spend the holiday with us!


So I'll leave you with a great recipe for a traditional hot-crossed bun that is as easy as it is delcious!


Hot Crossed Buns Recipe
From
Simply Recipes
Makes 16 buns.

Ingredients
1 1/4-ounce package active dry yeast (about 2 1/2 teaspoons)
3/4 cup warm milk
3 1/4 to 3 1/2 cups all purpose flour
1 teaspoon salt
1/4 cup plus 1 teaspoon granulated white sugar
2 teaspoons ground spices (for example, 1/2 teaspoon cardamom, 1/2 teaspoon cinnamon, 1/2 teaspoon allspice, 1/4 teaspoon cloves, 1/4 teaspoon nutmeg)
1 teaspoon salt
4 Tbsp butter, softened
2 eggs, room temperature (if taking right out of the fridge, let sit in warm water for a few minutes to take the chill off before using)
3/4 cup currants or raisins (can sub half of currants with chopped candied citrus peel)
2 teaspoons grated orange zest
 
Glaze
1 egg
1 Tbsp milk

Frosting
1 teaspoon milk or orange juice
3 to 4 Tbsp powdered sugar

Directions
In a bowl, stir together 1/4 cup of the warmed milk and one teaspoon of sugar. Sprinkle the yeast over the milk and let sit for 5-10 minutes until foamy.

In a large bowl or the mixing bowl of an electric mixer, vigorously whisk together 3 cups of the flour (reserving additional flour for later step), the salt, spices, and 1/4 cup of sugar.

Create a well in the flour and add the foamy yeast, softened butter, and eggs. Using a wooden spoon or the paddle attachment of your mixer, mix the ingredients until well incorporated. The mixture should be shaggy and quite sticky. Add in the currants, candied peel, and orange zest.

If you are using a stand-up mixer, switch to the dough hook attachment and start to knead on low speed. (If not using a mixer, use your hands to knead.) Slowly sprinkle in additional flour, a tablespoon at a time, kneading to incorporate after each addition, until the flour is still slightly tacky, but is no longer completely sticking to your fingers when you work with it.

Form a ball of dough in the bowl and cover with plastic wrap. Let sit, covered, at room temperature (or in a warm spot) for 2 hours, until the dough has doubled in size.

Press down on the dough to gently compress it. Roll the ball of dough into a log shape and cut it into two halves. Place one half back in the bowl while you work with the other half. Take the dough half you are working with and cut it into 8 equal pieces. The easiest way to do this is to roll it into a log, cut it in half, then roll those pieces into logs, cut them in half, and then do it again, roll those pieces into logs, and cut them in half.

Take the individual pieces and form them into mounds, placing them 1 1/2 inches apart from each other on a baking sheet. Cover with plastic wrap and then work the remaining dough into 8 equal pieces and place them in mounds on a baking sheet, again cover with plastic wrap. Let the dough mounds sit at room temperature (or warm place) to rise again, until the mounds have doubled in volume, about 30-40 minutes.

Preheat oven to 400°F. Prepare egg wash by whisking together one egg and a tablespoon of milk. If you want, you can score the top of the buns with a knife in a cross pattern. You will want to make fairly deep cuts, for the pattern to be noticeable after they're done. Using a pasty brush, brush on the egg wash over the dough mounds. The egg wash will give them a shiny appearance when cooked.

Place in the middle rack of the oven and cook for 10-12 minutes, until the buns are lightly browned. Remove from oven and let cool on the pan for a few minutes, then transfer the buns to a wire rack to cool.

To paint a cross on the top of the buns, wait until the buns have cooled (or the frosting will run). Whisk together the milk and the powdered sugar. Keep adding powdered sugar until you get a thick consistency. Place in a plastic sandwich bag. Snip off a small piece from the corner of the bag and use the bag to pipe two lines of frosting across each bun to make a cross.


Friday, April 22, 2011

Macaroon Mania! (Part 4 of 4 - Chewy Chocolate Macaroons)

Part 4: Chewy Chocolate Macaroons


And here is the end of our macaroon mania! These macaroons I had to give a try. They are so different than any other recipe I’d seen for a few reasons:
-They’re chocolate. Not drizzled, not dipped – full-on, in-your-face chocolate.
-They are cooked low and slow (250 for 45 minutes versus the typical 350 for 15-20 minutes)
-The contain flour
-There is no egg in this recipe


These macaroons were a cinch to make. But waiting for them to cook was absolute torture. Forty-five minutes seemed like an eternity to wait, especially once the kitchen started smelling of coconut and chocolate. Now that’s a lethal combination.


The payoff was worth it. The cookies are soft, and chewy, without being wet or sticky. These macaroons were divine. I was surprised too, because I was expecting to taste like a mounds bar, or just like a chocolate-dipped coconut macaroon. The chocolate had actually taken on a distinct ‘brownie’ taste, which really surprised me, but paired really well with the coconut.


I really recommend trying these. I never imagined I’d flip for such an unconventional macaroon, but it’s a winner. Why not try spicing up your typical Easter recipes?


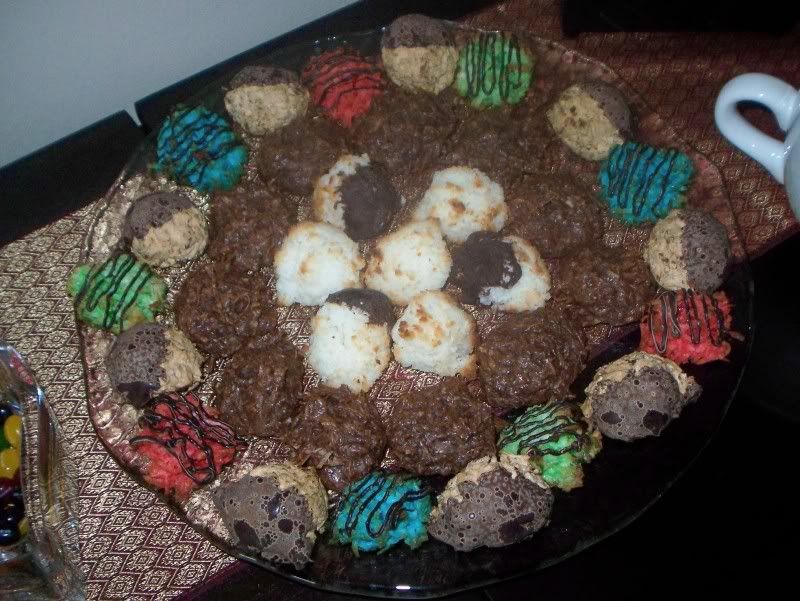
Well, there you have it. Macaroon Mania. In the end, I do think the classic coconut macaroon won out, but just by a hair. The chewy chocolate coconut macaroon was amazing as well, and I could easily justify having one (or two) of each, because they’re so different. Alton’s were delicious, more like a coconut meringue than what I consider a macaroon, but everyone who enjoys coconut went nuts over these. The chocolate drizzled macaroons were good, and would be fabulous to make nests out of with chocolate eggs for kids, but I like having the coconut a little more broken down than it was in these cookies, not to mention I preferred the more sophisticated look of the other cookies.

Previously: Macaroon Mania! (Part 3 of 4 - Chocolate Dipped Toasted Coconut Macaroons)

Chewy Chocolate Macaroons

Ingredients
2 ounces unsweetened chocolate, chopped
½ cup sifted cake flour
2 tablespoons unsweetened cocoa powder
1/8 teaspoon salt
2 1/2 cups lightly packed flaked sweetened coconut
1 teaspoonvanilla extract
1 (14-ounce) can fat-free sweetened condensed milk

Directions
Preheat oven to 250°. Line a baking sheet with parchment.
Melt unsweetened chocolate in microwave. Spoon flour into a dry measuring cup; level with knife. Combine flour, cocoa powder and salt. Add coconut to flour mixture and toss well. Stir in melted chocolate, vanilla and condensed milk.
Drop the batter by level tablespoons 2 inches apart onto a baking sheet. Bake at 250° for 45 minutes. Cool 10 minutes on pan or rack


Yield: 32 cookies (serving size: 1 cookie)

Wednesday, April 20, 2011

Macaroon Mania! (Part 3 of 4 - Chocolate Dipped Toasted Coconut Macaroons)

Part Three: Chocolate Dipped Toasted Coconut Macaroons
This recipe appealed to me for two main reasons:
The coconut is toasted before incorporating into the recipe
The egg whites are whipped into a meringue-like consistency before using, instead of just mixing everything together.


This one, like the first cookie, required a little more than a wooden spoon to make. While these were good, I’m not sure this is the first recipe I’d run to if I was craving a macaroon. I’d consider these more along the lines of a coconut-flavored meringue instead of a macaroon. But that doesn’t mean that all the coconut lovers in our house didn’t go crazy for them. These were some of the more popular cookies, despite not being a traditional macaroon. You never know if you don’t try.


Up Next: The exciting conlusion to Macaroon Mania! – Part Four: Chewy Chocolate Macaroons


Chocolate Dipped Toasted Coconut Macaroons
From Alton Brown

Ingredients
4 large egg whites
pinch of salt
1/2 cup sugar
12 ounces sweetened shredded coconut, toasted
2 (3 ounce) kosher milk chocolate bars, coarsely chopped

Directions
Preheat oven to 350 degrees F. Place coconut on a baking sheet, spread out evenly and place in the oven.

Return to the oven every five minutes to stir the browning coconut. Once evenly browned, after about 15 minutes, remove the the oven and allow to cool.

In a mixer fitted with a whip attachment. whip egg whites and salt until they become white and begin to stiffen. Add sugar in 3 parts. Continue to whip until the egg whites are very stiff. Fold in toasted coconut.
On parchment lined cookie sheets, drop a teaspoon of the mixture leaving 1 to 2 inches around each cookie. Place into the oven and bake for 15 to 20 minutes. The outside should be golden brown but the insides should still be moist.

Place chocolate chunks in a heatproof bowl. Place bowl over a pan of simmering water so that the bottom of the bowl does not touch the simmering water. Allow to melt. Stir until loose and creamy. Partially dip the macaroons in the chocolate then allow to cool and harden on a parchment lined sheet. You can place the pan of chocolate dipped cookies in the refrigerator to speed up the hardening process.

Tuesday, April 19, 2011

Macaroon Mania! (Part 2 of 4 - Chocolate Drizzled Macaroons)

Part Two: Chocolate Drizzled Macaroons
I was curious what making macaroons without the food processor would be like. But I couldn’t make them plain like the first ones, that would be too boring! So I decided to go with some Easter egg colors to make the plate a little more festive.


I liked that these went together easily, but I did notice that these looked a little more like dyed hay bales when I scooped them onto the baking sheet. Because all the little shreds of coconut were still whole, these macaroons were a little more fibrous than the first macaroons. These would be great to make little nests out of to hold chocolate eggs, but as far as taste and texture goes, the first macaroons were far superior.

Up Next: Macaroon Mania! – Part Three: Chocolate Dipped Toasted Coconut Macaroons
Previously: Macaroon Mania! - Part One: The Coconut Macaroon

Chocolate Drizzled Macaroons
From Baker’s Coconut. Yield: 2 dozen

Ingredients
1 (14 oz) Bag Shredded Coconut
2/3 c Sugar
6 Tbsp Flour
¼ tsp Salt
4 Egg Whites
1 tsp Almond Extract
Assorted Food Coloring
½ c Semi-Sweet Chips

Directions:
1. Preheat oven to 325 degrees F. Grease and flour baking sheets; set aside. Mix coconut, sugar, flour and salt in large bowl. Stir in egg whites and almond extract until well blended. Divide mixture into separate bowls, add food coloring one drop at a time until you reach desired color.

2. Drop coconut mixture into 36 mounds, 2 inches apart, on prepared baking sheets, using about 1 tablespoonful of the coconut mixture for each mound. Bake 20 min. or until edges are golden brown. Immediately remove from baking sheets to wire racks. Cool completely.

3. To decorate with drizzled chocolate, place chocolate in a sandwich bag on a microwave safe dish and microwave in 30 second intervals moving the chocolate around between each interval until melted. Using scissors, cut the tip off the sandwich bag. The smaller your cut, the smaller the drizzle. Use the sandwich bag to pipe the chocolate back and forth over the macaroons until you reach the desired look.

Sunday, April 17, 2011

Macaroon Mania! (Part 1 of 4 – The Coconut Macaroon)

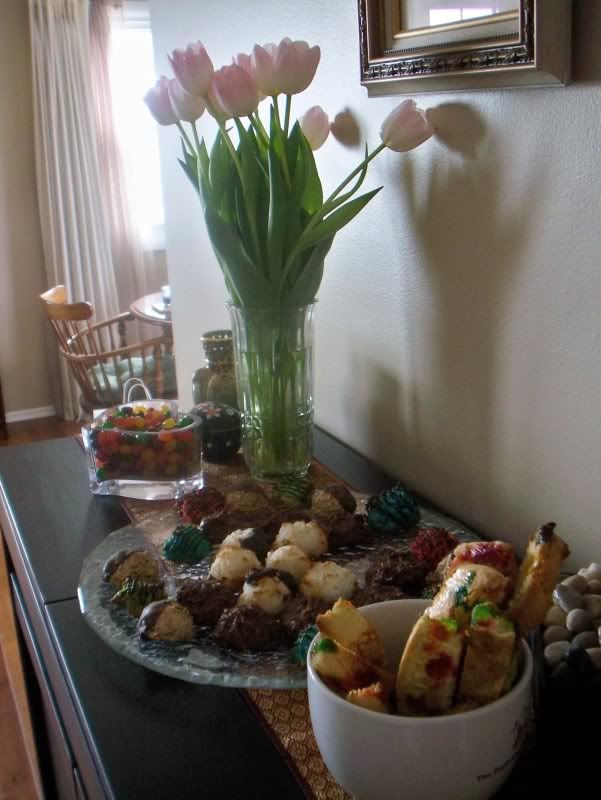
With a week to go before Easter, I figured it might be fun to delve into some Easter goodies! For some reason, even with all the chocolate bunnies, Cadbury Crème eggs, jelly beans and assorted other Easter candy, I always look forward to the macaroons the most. Don’t get me wrong, I won’t ever turn down the opportunity to chomp the ears off of an unsuspecting chocolate bunny, or stuff myself to the gills with Jelly Bellys, but, if I want an Easter tradition that I can truly savor and enjoy, it’s the macaroon. I wanted to find a good macaroon recipe to share with my family and was not really surprised that an internet search for ‘macaroon recipe’ returned a ton of results. I was surprised, however, at the many different types of macaroons out there. Because I was intrigued by the results of my search, I pulled four macaroon recipes to try. Yes, four. And if you can believe it, these cookies were all made in one evening. I know, it’s crazy. But sometimes we do crazy things in the name of food.


Part One: Classic Macaroons


I figured the best place to start would be the beginning, with the cookie that started this process. The classic coconut macaroon. Just by hearing the word macaroon, I envision a very specific cookie. To me, a macaroon is creamy colored and slightly toasted on the outside, not sticky, and when you bite into it, you get the slight crispness on the outside coupled with a soft, melt-in-your-mouth center. It should have a slight chew, but if I can’t swallow it after about four or five bites, it is too chewy.


This recipe from Baking Bites fit the bill. The picture featured with the recipe look exactly like the cookies I was imagining, so I gave this recipe a try. Everything about making these cookies went pretty smoothly, I only had a slight issue when trying to put the cookies on the baking sheet. The cookies themselves are either very delicate, or else I manhandled them, because fell apart pretty easily as I was trying to spoon them out. A quick fix stuck them back together and then into the oven they went.


The end result was exactly what I envisioned a perfect macaroon. I had hit coconut bliss but, I wasn’t done. There were three more recipes that caught my attention, and I had to see if there were any macaroon versions I liked more than the original. And don't let the fact that you need a food processor discourage you - these are worth a little extra cleanup!


Up Next: Macaroon Mania! Part Two: Chocolate Drizzled Macaroons


Coconut Macaroons

Ingredients
4 cups shredded, sweetened coconut (unsweetened is fine, too)
1/2 cup sugar
2 large egg whites
1/8 tsp salt
1 tbsp cornstarch
1 tbsp rum (or 1 tsp vanilla extract)

Directions
Preheat oven to 350F. Line a baking sheet with parchment paper
Place shredded coconut into a food processor bowl and pulse several times until coconut is finely chopped (not into coconut flour, but into approx. small, rice-sized bits).
In a large bowl, whisk together egg whites, sugar and salt until smooth. Whisk in cornstarch and rum. Stir in coconut, making sure the entire mixture is an even consistency.
Drop by rounded teaspoons (so roughly 2 tsp balls, if using a standard measure) onto a parchment lined baking sheet.
Bake for 15-20 minutes, until golden on the bottom and top.
Cool on baking sheet for 5 minutes, then transfer to wire rack to cool completely.
Makes about 3 – 3 1/2 dozen
Linked to:

Tuesday, April 12, 2011

Easter Biscotti

When my brother and I were little, my parents the Easter Bunny, would create a path of candy, either jelly beans or m&m’s, originating from our rooms to our respective Easter Baskets. I seem to recall that my brother would pick them up and eat them as he went, whereas I would collect a handful and then shove them all in my mouth at once – classy, right? I loved Easter – it was the only other holiday other than Halloween where we got a free pass on candy consumption (I guess they were hoping that our resulting stomachaches would teach us a lesson. Nope.).

In our baskets, there would always be a chocolate bunny, jelly beans and m&m’s, among other things.

Do you eat your rabbits ears first, feet first, or tail first? I’m totally an ears person. But, I digress. I always really enjoyed jelly beans, especially all the black, licorice flavored ones my brother and mom despised. I had to fight my dad for those. Aside from Jelly Belly brand, I didn’t really know other kinds existed. My husband introduced me to Starburst jelly beans a few years ago, and I’ve been hooked ever since.

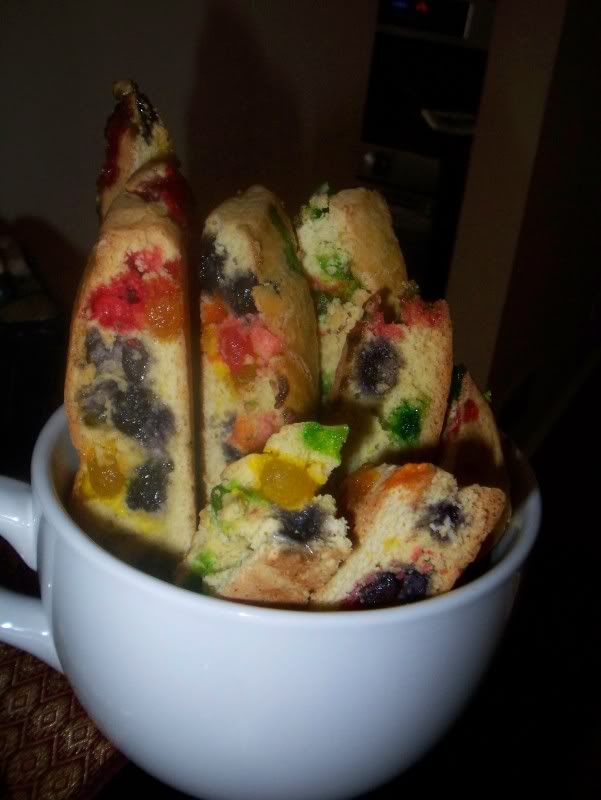
We saw the bags were on sale at our local store, which of course meant we bought more than we should have. I saw this jelly bean biscotti recipe a while ago on Culinary in the Desert, and figured the jelly bean excess would be a good excuse to try out the recipe. The biscotti looked so festive, and the recipe itself was intriguing – would jelly beans in a baked good taste ok?

Everything assembled nicely for the biscotti, and I got it in the oven without incident. I am so glad I had put parchment paper down, because I didn’t think about the jelly beans becoming molten pockets of colored sugar as they baked into the dough. The bit that leaked out onto the paper cleaned up easily, and I had a clean cookie pan once they were done.

My main issue was that the biscotti were very difficult to cut from the log into 1/2” segments - mine were larger than that. The still melted jelly beans would ooze onto the parchment and stick to the knife, and make cutting the next piece off either messy or impossible. I practically had to wash jelly bean goop off of the knife in between each cut. Eventually, I got them all cut and back in the oven, where more of the jelly bean goop leaked out from the cut edges. Once they were out of the oven and cooled, it was time to sample.

The verdict?

They are definite cute and festive, but the jury was still out on whether we liked the taste of them, or were more won over by the novelty of the biscotti. I think I liked them, but I’m not sure if I’ll be making them again – I can think of many other Easter specialties (including my Carrot Cake Cheesecake) that I’d rather spend the time both baking and eating.
Because I wasn't sure how jelly bean biscotti would be received, I made a half batch, which worked out fine for us.

Easter Biscotti.
From Culinary in the Desert
3 cups all-purpose flour
2 teaspoons baking powder
1/2 teaspoon salt
4 tablespoons unsalted butter, softened
1 cup sugar
4 large eggs, divided - at room temperature
2 teaspoons vanilla
12 ounces Jelly Beans

Preheat the oven to 375°

In a medium bowl, sift together flour, baking powder and salt.

In a large mixing bowl, cream together butter and sugar until light and fluffy. Add 3 eggs, one at a time, beating until incorporated. Mix in the vanilla.

Add in the flour mixture and mix just until combined. Using a wooden spoon, stir in the Jelly Beans. The dough may be a bit sticky.

Scoop dough onto a lightly floured surface. Divide the dough into 2 pieces. Take one half and roll lightly back and forth making a log about the length of your baking sheet. Carefully place it on a baking sheet lined with parchment paper. Repeat with the second piece.

Using wet fingers if the dough is sticky, flatten each log a bit.

In a small bowl, whisk the remaining egg and brush evenly over each log.

Bake for about 23-28 minutes or until they are slightly golden brown.

Remove from the oven and let cool for at least 10-15 minutes (can go a little more.) Using a serrated knife, carefully slice them on the diagonal into about 1/2" slices. Stand each slice back on the baking sheet - it is ok if they touch.

Bake for another 10-12 minutes until the edges turn a slight golden brown. Transfer to wire rack to cool completely.


Friday, April 8, 2011

Easter Bunny Bread

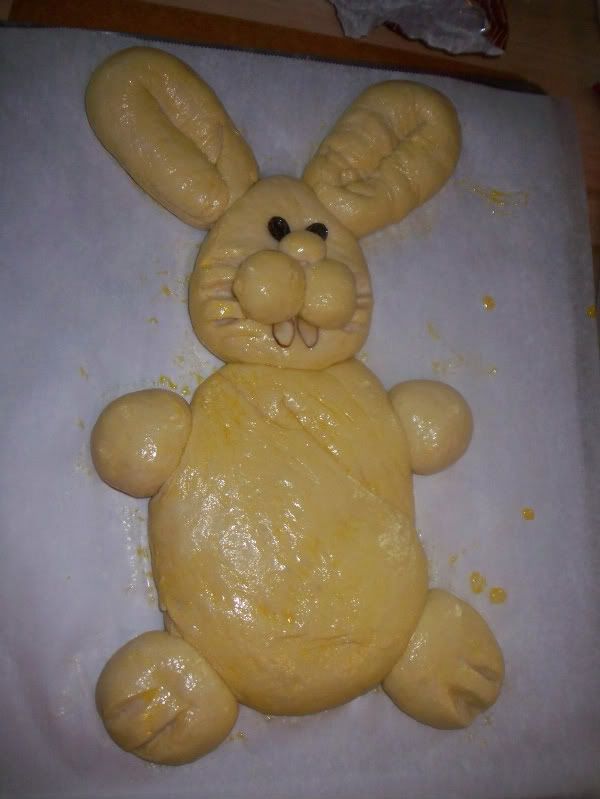
It’s been nearly two years since we’ve owned our house, and I am still shocked at how few decorations we have. Aside from some Christmas lights, my homemade thanksgiving decorations and an Easter serving platter, we have very few things with which to adorn our house for specific holidays. It’s true that the money we saved on decorations has most likely contributed to the fact we’ve been able to afford new appliances as we need them, but I definitely enjoy the feel of a home that is lovingly decorated for each season. Unlike Thanksgiving, I didn’t have a lot of time to make decorations this time; so I figured I’d adorn our table with something that is not only cute, but multi-purposed - an Easter-themed decoration that is also our table centerpiece, appetizer and bread for the meal.

The original recipe for the Easter Bunny bread called for using one-pound tubes of frozen bread dough. I did not even know there was such a product, not to mention I did not know where to look for it in the store. So I just decided to make my own bread and just measure off the necessary amounts of dough for the recipe.

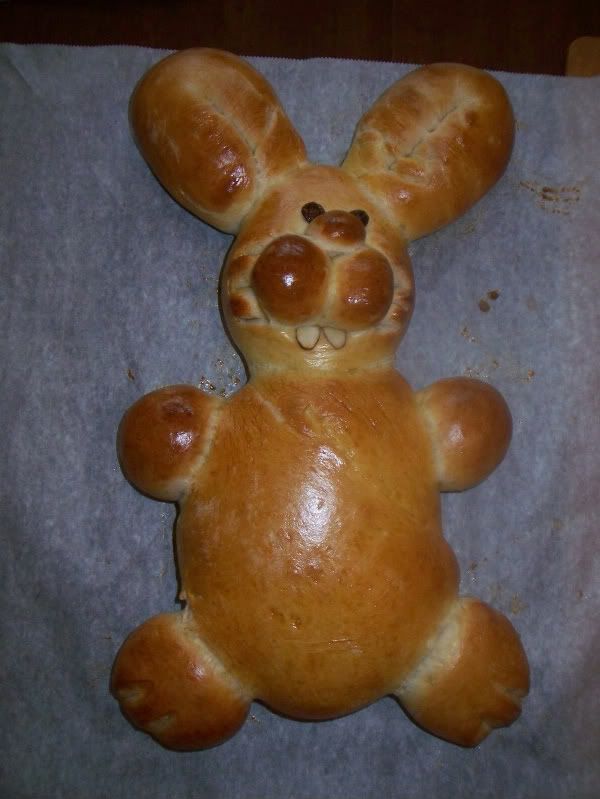
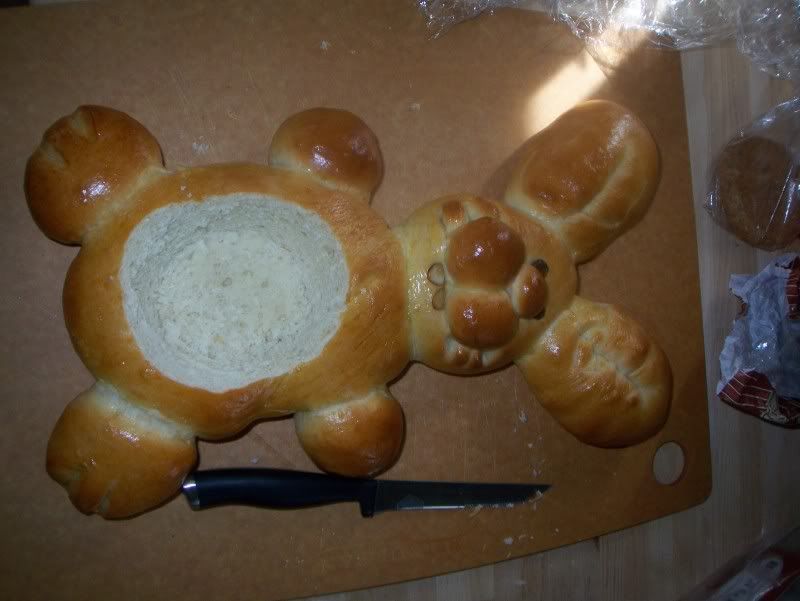
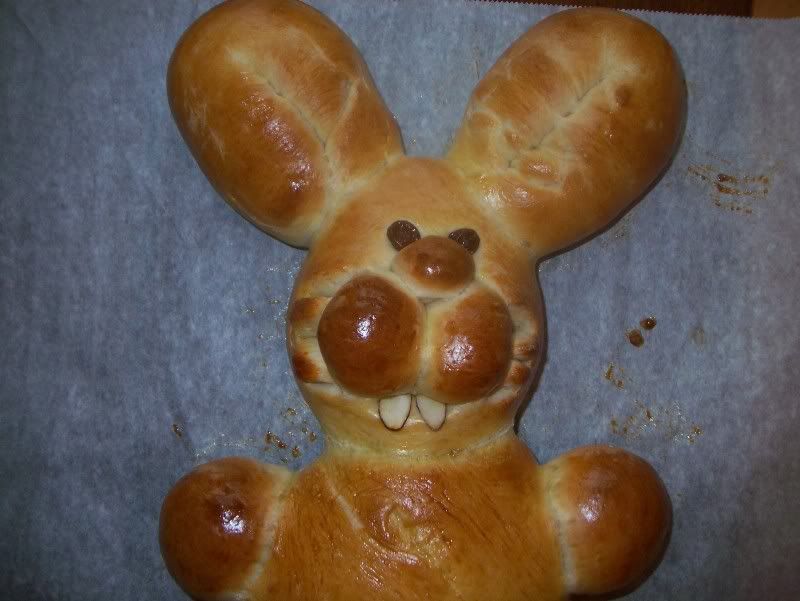
This Easter Bunny was fun to make, and my family got a kick out of me lovingly sculpting him out of bread dough. He so cute coming out of the oven that I felt incredibly guilty cutting the midsection out of the poor bunny, but you have to do what you have to do. I can promise that covered his eyes beforehand and that he didn’t suffer. The cavity was then lined with lettuce and filled with a garlic, lemon and dill dip and fresh veggies (as well as the cubed bread cut from the midsection) were laid out on the platter to serve as an appetizer prior to the meal being served.

Once dinner was ready, it was time to dig into our little bread bunny. To be honest, I was a little worried how my family would react to ferociously dismantling an innocent rabbit to get a dinner bun, but my fears were soon put to rest as soon once husband asked for the left ear. Everyone else started asking for cheeks, arms, legs and portions of the head. They were rewarded with soft bread that had a relatively tight crumb and subtle sweetness from the honey.


Even if you don’t have to heart to make, bake and eat an Easter Bunny, you can make this bread as per its original instructions and have a wonderful braided loaf to proudly serve with your Easter dinner.


Honey Buttermilk Bread
Adapted Slightly From
NY Girl Eats World

1/2 cup warm water
1 packet of yeast
1 tsp sugar
1 ½ cups buttermilk, slightly warmed
2 Tbsp butter, melted
1/4-1/2 cup honey
6 cups flour, separated
egg wash (1 beaten egg with 2 Tbsp water)
sesame seeds, optional

Pour the warm water into the bottom of a large bowl and add the yeast. Then sprinkle in the sugar and then let it sit for 10 minutes. It should be foaming by this point.

Once the yeast has foamed and frothed, add the butter, milk and honey, whisking it all together vigorously.

Add 2 cups of flour and mix with a wooden spoon until incorporated. Add two more cups and mix well. Once the dough is pulling away from the sides of the bowl, add a cup more to soak up the rest of the moisture.

Scatter the remaining cup of flour on your kneading surface. Dump the shaggy dough from the bowl and begin gathering it into a ball and kneading it. Knead the dough for 5 to 10 minutes until you have a smooth, firm pale-yellow ball of dough that gives a thud when you slap it.

Grease the bowl you mixed the dough in and put the dough back in. Let it sit and rise for an hour and a half in a warm place.

Preheat the oven to 350 degrees. When the dough has risen to double its original size, gently punch it down and turn it back out on a lightly floured surface.

If you plan on making the easter bunny bread, skip this last part and start with the Easter Bunny Bread directions. Otherwise, continue this recipe to get a delicious loaf of bread that doesn’t look like Bugs Bunny.

Easter Bunny Bread Directions
From
Taste of Home published in Quick Cooking March/April 2001, p13

Ingredients
2 pounds of bread dough (one batch of the recipe above should suffice or you can use two 1 pound frozen loaves, thawed)
2 raisins
2 sliced almonds
1 egg, lightly beaten
Lettuce leaves
Dip of your choice (I used the Creamy Garlic Dill Dip found below)

Directions
Cut a fourth off of one loaf of dough; shape into a pear to form head. For body, flatten remaining portion into a 7-in. x 6-in. oval; place on a greased baking sheet. Place head above body. Make narrow cuts, about 3/4 in. deep, on each side of head for whiskers.

Cut second loaf into four equal portions. For ears, shape two portions into 16-in. ropes; fold ropes in half. Arrange ears with open ends touching head. Cut a third portion of dough in half; shape each into a 3-1/2-in. oval for back paws. Cut two 1-in. slits on top edge for toes. Position on each side of body.
Divide the fourth portion of dough into three pieces. Shape two pieces into 2-1/2-in. balls for front paws; shape the remaining piece into two 1-in. balls for cheeks and one 1/2-in. ball for nose. Place paws on each side of body; cut two 1-in. slits for toes. Place cheeks and nose on face. Add raisins for eyes and almonds for teeth.

Brush dough with egg. Cover and let rise in a warm place until doubled, about 30-45 minutes. Bake at 350° for 25-30 minutes or until golden brown. Remove to a wire rack to cool.

Place bread on a lettuce-lined 16-in. x 13-in. serving tray. Cut a 5-in. x 4-in. oval in center of body. Hollow out bread, leaving a 1/2-in. shell (discard removed bread or save for another use). Line with lettuce and fill with dip.

Yield: 1 loaf.

Creamy Dill Dipping Sauce
Adapted from
AllRecipes.com

Ingredients
3/4 cup sour cream
2 tablespoons chopped fresh dill (or 2 tsp dried dill)
1 teaspoon lemon juice
1-2 cloves finely diced (or pressed) garlic
salt and pepper to taste

Directions
In a small mixing bowl, combine sour cream, garlic, dill, lemon juice, and salt and pepper. Cover and refrigerate at least 1 to 2 hours before serving.


Flatten and shape the dough into a rectangle, then cut it into three equal strips, lengthwise. Cross the strips into a braid and tuck the ends under. Move the bread to a greased baking sheet and let it rest for 15 minutes.

Brush the egg glaze over the top of the bread, which will give the finished bread a nice sheen, and sprinkle the bread with sesame seeds, if using. Finally it's time to perfume the house with the sweet scent of this golden loaf: Bake in the oven for 30-40 minutes and let cool.
Related Posts Plugin for WordPress, Blogger...