Showing posts with label summer. Show all posts

Monday, September 6, 2010

Hibiscus Leaf Tea Granita

Happy Labor Day!!

This recipe is my attempt at clinging onto summer just a little bit longer. I'm not ready for autumn, much less winter, yet.

This year marked the 30th anniversary for the Taste of Chicago, a quintessential summer event here. This year, they did things a little differently. There were fewer vendors, and the layout changed from previous years. Instead of the vendors going right up the middle of the street, they now are only on the sides of the road, leaving a much more open area in the middle for walking, eating and scoping out your next bite. One of the perks of working in downtown Chicago is that a group of us hit the taste for lunch one day. We get there right as it opens, usually mid-week, so that we avoid the lunch/weekend-rush that the Taste is infamous for.

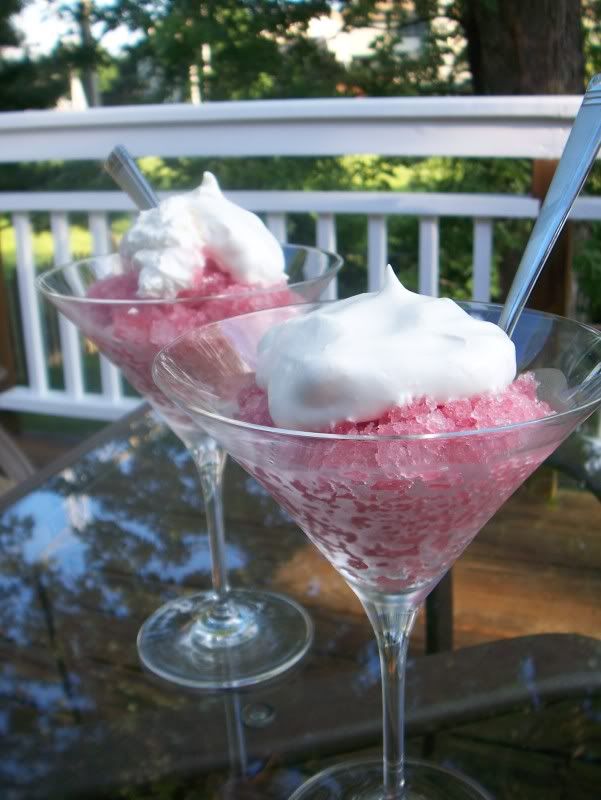
If you are not from Chicago, I can see going to the Taste and getting an Italian sausage, deep dish pizza slice or a ‘garden dog,’ but for me, I use the Taste as an excuse to sample anything I have not tried before. Last year I had shark and curried goat. This year I had my first ever fresh pierogies, a jibarito sandwich and something called bissap sorbet. The sorbet was described as a hibiscus leaf tea sorbet served with a dollop of whipped cream. It was such a refreshing, light dessert in the hot, humid weather and left me feeling satisfied without feeling too guilty (hey, at least it wasn’t a slice of cheesecake!) I left the Taste thinking that I would buy a quart of that if I could, it was a perfect summer treat.

As luck would have it, that weekend my family and I went to Chicago’s Chinatown, and we stumbled upon a store that sold nothing but tea. As we were shopping around for green teas (they had some there that retailed for 124 dollars a pound!), the cashier came by with samples of some of their other tea varieties. One was hibiscus tea. As soon as I tasted it, I grabbed a box, paid for it, and left with a plan to recreate the sorbet from the Taste.

Because I do not have an ice cream maker, I decided to make a granita instead. It’s a little more coarse than sorbet, but finer than Italian ice, so I figured that would be a good compromise. It took forever for the granita to freeze. There is patience required in waiting for the hot water to cool enough to put in the freezer, and then you have to babysit it for as long as necessary, scraping the sides of the bowl down so you get granita and not a giant pyrex-bowl-shaped popsicle.

While it did take forever, the results were definitely worth it. It is light, refreshing and practically guilt-free. I used a 1/2 cup of sugar in mine, which is the only ingredient other than the tea in this recipe. The four cups of water yields probably a good 8-10 servings (we’ve already finished six and still have quite a bit left). One serving has a maximum of approximately one tablespoon of sugar, or 15 calories. It can’t get much better than that. Ok, well if you want the twenty-five calories you get from the additional two tablespoons of cool whip, still not a diet-buster.

Hibiscus Tea Granita


3 Hibiscus leaf tea bags
½ c sugar
4 c water, divided (2 cups can be cool/room temperature)

Put two cups of water and sugar in pot over medium heat. Heat, while stirring, until sugar dissolves into water. Drop in tea bags and let steep for 5-7 minutes, or until a dark raspberry color. Add in the additional two cups of water and let sit for a few more minutes. Remove tea bags and let sit on counter until room temperature. Place mixture in freezer and let sit for 1.5-2 hours. Scrape down sides with a fork. Let sit in freezer again for another hour to hour and a half. Scrape down sides. Repeat process until liquid is all frozen. Serve plain or with a small dollop of cool whip or whipped cream.

Monday, August 16, 2010

Ribs

While most Marylanders know that it’s not summer without Crab Feasts, I also think that barbecue and pit beef deserve their spot in the “It’s not summer until you have...” category. Crab Feasts and barbecue seem to accompany most of my favorite memories. Now living in the Midwest, Crab Feasts are few and far-between but barbecue... that’s one thing we do have.

Going to school in southwestern Virginia, ribs I remember going to some of my first college football games (when they were still in the Big East), and seeing the hard-core tailgaters with their smokers pulling behind their Winnebago as they drove into the parking lot to find their spots on game day. This was the first time I’d ever seen an entire pig in a smoker. While it was a little strange at first (I loved Wilbur from Charlotte’s Web!), I gladly got my spot in line to try some. Walking up, I grabbed a bun, and the guy literally grabbed a piece of meat, pulled it off, and stuck it on my bun. It practically shredded itself on my sandwich it was so tender.

Even our rehearsal dinner was catered by a local barbecue joint (if you’re in the area and want some delicious barbecue, look out for Andy Nelsons http://www.andynelsonsbbq.com/)

I have made shredded pork and chicken several times in the slow cooker, but had always been a little hesitant to make ribs. I think it was mainly because the time commitment for ribs is more than most other things I have tried. And while these baby back ribs did take seven-and-a-half hours in the oven, the only problem I had was smelling the ribs all day. I couldn’t figure out why I was so hungry the entire day, until I would walk upstairs and hit the smell of the ribs. I also had not thought about how I would prepare a few of the other dinner items needing an oven. With a little bit of thinking and a lot of help for our countertop toaster/convection oven, we easily rectified the problem.

The fact that there are no “after” pictures, while sad, is truly a testament to how delicious these ribs were (and how hungry we all were after smelling them cook for hours!).


Slow Barbecue Ribs
Adapted From:
Use Real Butter

4-5 lb. rack of ribs (I used 2 full racks of baby back ribs)
dry rub – recipe below
1 1/3 cup random store-brand BBQ sauce like Masterpiece or Bullseye (something with molasses in it – a sweeter type)

Dry Rub

2 Tbsp cumin
2 Tbsp brown sugar
4 Tbsp paprika
2 Tbsp chili powder
2 tsp cayenne powder
2 tbsp salt
2 tbsp black pepper, ground
1 tsp onion powder
1 tsp garlic powder

Mix together.

Dry off the rack of ribs. This is personal preference, but I cut my racks into three sections – they’re easier to fit in my pans, and easier to pick up after cooking without breaking into bits.

Rub spices over all of the rack. Cover in plastic wrap and refrigerate for up to 24 hours, but at least 4 hours.

Preheat oven to 225F.

Place the rack in a large roasting pan lined with foil for ease of clean up.

Cover with foil. Bake the ribs for 8 hours (Mine baked for 7 1/4).

Remove from oven and set the ribs on a rack to let the excess fat drip off (to reduce the grease fire on the grill).

Heat the grill on high for ten minutes, then reduce heat to medium.

Place the ribs on the grill for 5 minutes, covered.

Flip the ribs and grill for another 5 minutes.

Flip again and brush the top side of the ribs with barbecue sauce and allow grilling for 5 minutes.

Flip one last time and brush the top side with more sauce.

Serve, preferably with a tub of Wet-Wipes.

Sunday, July 25, 2010

Key Lime Pie

Ok, so I lied. It’ not really a Key Lime Pie. It’s a Persian Lime Pie. But that does not make it any less delicious. I also have yet to figure out how to make the perfect graham cracker crust. The ones I make taste great, but they tend to be very delicate and on the verge of crumbly. That is one of the perks of using the premade graham cracker crusts, I find them much sturdier than I could ever make mine. Even a crumbly crust could not stop me from finding homemade far superior than store-bought, however. I love having the freedom to make a crust as thin or as thick as I want, and I can control how much sugar I add.

For 2/3 cups of lime juice, I used all but five of my limes out of a pound of Persian limes. Those suckers are tiny. That afternoon, my juicer was my BFF for life. I did omit the lime zest that is originally called for in the recipe. Call me old-fashioned, but I love the homogenous color of a classic key lime pie. (It should probably also be noted that I do not have a microplane zester, and that is about the only way you’re getting any zest off of those things. I tried using my mini grater, and after grating my fingers three times and having no zest to my name, I quit. That may or may not have predominately influenced my decision to love the classic key lime pie.)

My family tends to like the embellishments simple; just a nice, healthy dollop of cool whip. I prefer it plain, though. I added a little extra juice than called for in the original recipe. I like my pies tart. This one did not disappoint. This pie has a pronounced tartness that is perfectly balanced with the sweetness and richness of the graham cracker crust.

My only complaint I have is that literally takes 30 minutes to assemble and bake, you have to wait over an hour for it to chill before you can finally dig in. That’s just plain cruel.


Key Lime Pie


Adapted from
The Pioneer Woman

Ingredients

Crust

13 whole Graham Crackers (the 4-section Large Pieces)
1/4 cups Sugar
1/4 cups Butter, Melted

Filling

2/3 cups Lime Juice
2 whole Egg Yolks
1 can (14 Oz) Sweetened Condensed Milk
Preparation Instructions
Preheat oven to 350 degrees

For the crust:
Crush crackers in a food processor or Ziploc bag. Pour them into a bowl and stir in sugar and melted butter. Press into a pie pan and bake for 5 minutes or until golden and set. Remove from oven and set aside to cool slightly.

For the filling:
Mix lime zest, lime juice, and egg yolks in a mixing bowl. Add in condensed milk and mix on high until smooth and thick. Pour mixture into crust and bake for 15 minutes.
Remove from oven, allow to cool, then refrigerate for at least 1 hour—more if possible.

Serve plain, with a dollop of Cool Whip, or the sweetened lime whipped cream as described in the original recipe.

Wednesday, July 7, 2010

Summertime Cupcakes

Playing in a company softball league this summer gives me the perfect excuse to try out new things without being required to consume all of them myself (or forcing my poor husband to eat them all!) I recently bought a mini ball pan from the Wilton Tent Sale here, and what a better excuse to see what perfectly round cupcakes look like than softball cupcakes! Because I was in a hurry, I used a devil’s food boxed cake mix and a can of vanilla icing.

One of the perks of this softball league is that you are allowed to bring your own booze to the games and drink while you play. (And, given our record, that’s probably a good thing!) So, of course, I had to incorporate booze into the cupcakes somehow. I made a brandy whipped chocolate ganache to fill the cupcakes and, let me tell you, you can definitely taste the raw brandy in the filling. I probably wouldn’t be serving these to any kiddos, but you can always leave the alcohol out for a kid-friendly filling. If you remember my Irish Car Bomb Cupcakes, I felt the filling was a little too dense, so I opted for a higher cream-to-chocolate ratio this time around, and whipped my ganache as it was cooling so it wouldn’t be quite so dense when it set up. While tasty, I think I over-compensated a little. I doubt I needed to whip the ganache, but I certainly did no harm in doing so.

Next time, I will use a little bit denser mix or make my own batter, because while I love the fact that the cake was light and airy, the crumb was a little too moist and delicate to handle as much as I needed to for the filling and frosting of the cupcakes. I only had one mini ball pan with six cavities for batter which meant I had to bake off four batches of cupcakes to use up the mix and noticed that the longer the cake mix sat, the funkier the cupcakes looked as they baked. The first batch were beautifully domed. The second batch, the outer edges rose first, and then they got a weird hump-thingy in the middle. The final batch did a similar thing to the second batch, but a little more pronounced. That was a little bizarre to see, but I guess that’s why the instructions say to bake the cake ‘immediately’ instead of baking the cake ‘whenever you feel like it.’ Good to know.

Also, don’t make the same mistake I did, and while waiting for my ganache to cool enough that I could whip it, I thought I’d get a head start icing my cupcakes. Anyone else notice a problem with this? After getting through three of the mini-balls, I realized that I cannot pick up my cupcakes to fill them now, so I had to poke a hole through the icing, fill it, and re-ice the whole dern cupcake. And I made an absolute mess of my piping bag. That’s the one problem of my mind constantly running faster than my logic filter.

Like I mentioned, the cupcakes were made from a box mix. The icing was just the can of vanilla icing, with part of it tinted pink/red for the stripes. The only thing I made ‘from scratch’ is the chocolate ganache, and even that is as easy as throwing together a box cake mix.

(I hesitated to post these because I'm still practicing my piping skills with my new decorating set. I'm sure if I had more than 20 minutes to decorate them, they'd look a whole lot better. But I guess if I post these now, I will one day be able to see an improvement on my skills in the future!)


Chocolate Ganache

2/3 c Chocolate chips
2/3 c cream
1 tbsp butter
1 tbsp brandy

I put all my ingredients into a pyrex cup and microwaved in 30 second intervals, stirring each time. It took about 2-2 1/2 minutes for the chocolate to completely melt. I then let it cool to room temperature, stirring every 15-20 minutes or so, and once it got thick, whipped it with a whisk until it was light and airy. And addictive.

Saturday, July 3, 2010

Chili Chicken Wings

I’m glad these wings were good, because these nearly made me cry. If you have ever gotten raw ginger juice in your eyes, you know what I’m talking about. If you haven’t, take it from me – don’t. I always peel my ginger with a spoon, because I like to stand over the trash so the peel falls in, and I don’t have the manual dexterity to peel ginger skin with a knife without risking losing a pinky or needing stitches. I always thought it was safer to use a spoon, but when I got that squirt of fresh ginger juice in my eye, I just about would have sacrificed my whole hand to get the pain to stop. Ten minutes later, I was finally able to open my eye, only to have it tear up relentlessly. Thankfully, the more time that passed, the better my eye felt, and I no longer had to walk around the house with a permanent wink.

Minus the ginger incident, the rest of the dish came together really easily. I did use a little more cornstarch/water mixture than in the recipe, because I like my sauces a little thicker. Other than that, I kept everything the same, and they were delicious. I left the skin on the wings, so I don’t think I’d call these “health food,” but I did make a point to find a wing recipe that was baked, and not deep-fried (though this sauce would be great on fried wings as well). This was a great cookout food, and one that will certainly be gracing our table again in the future.


Chili Chicken Wings

From: Epicurious.com

For the sauce:
1 1/2 cups rice or cider vinegar
1 cup sugar
3/4 cup ketchup
6 tablespoons Chinese plum sauce
1 tablespoon hoisin sauce
2 tablespoons finely chopped garlic
2 tablespoons (or to taste) finely chopped fresh red, jalapeño or serrano chili, with seeds (I removed the seeds to keep the heat down a little bit)
3 tablespoons finely minced fresh ginger
1 teaspoon salt, or to taste
2 tablespoon cornstarch mixed with 2 tablespoon cold water

30 chicken wings (tips removed), rinsed and patted dry
2 tablespoons chopped cilantro, for garnish

Prepare the sauce: Combine all the sauce ingredients in a small, heavy saucepan. Bring to a boil over medium-high heat, reduce to medium-low and simmer, stirring constantly to blend the flavors, about 5 minutes. Remove from the heat and cool to room temperature. Puree in a food processor until nearly smooth. (Makes 3 cups.) Store, covered, in the refrigerator for up to 2 weeks.

Preheat the oven to 350ºF.

Using a sharp knife, separate the chicken wings at the joint. Set aside. (I also take the ‘pointy part’ off the end of the wing as well)

Place the chicken wings in a large bowl and toss well with 1 1/2 cups of the sauce.

Lay the chicken wings in a single layer on 2 or 3 baking sheets (do not overcrowd them). Bake for 45 to 50 minutes, basting once or twice with additional sauce. Place the wings on a platter, sprinkle with cilantro and serve.

Related Posts Plugin for WordPress, Blogger...