Monday, February 28, 2011

Chocolate Pudding (and Variations on a Theme!)

I cannot even begin to tell you just how much of this pudding I have eaten in my lifetime. I know that when I got my wisdom teeth out, this pudding was the only thing I could stomach for about two days, meaning my mom had an endless supply waiting for me in the refrigerator. That time alone, I’m sure I ate close to a gallon of this stuff. Same story when I had my tonsils removed at the ripe old age of 20 (yuck!)


But, the absolute best thing about this pudding was that I could make it in the confines of my college dorm room. A few simple ingredients, a bowl and a microwave were all I needed to bring a little piece of home to my dorm – even if just for dessert.


A few nights ago, the hubs mentioned that we had some milk in our fridge that was ‘on its way out.’ He has never had this before, so I figured now would be a good time to make it. I made the first batch with regular unsweetened cocoa, but then for the second batch, I accidentally grabbed the Hershey’s Special Dark cocoa. What a wonderful mistake that was! The hubs, who typically prefers milk chocolate, did prefer the first batch, while I, who adores dark chocolate, gobbled up the second batch.


Then it happened… I found marshmallow fluff in my pantry and chocolate graham crackers. After the pudding set, I put the marshmallow fluff on top and crumbled on some graham crackers for a makeshift s’mores pudding dessert. It is amazing how simple pantry items can jazz up a relatively simple dish. The top picture has peanut butter drizzled on top of the whipped cream. Absolute heaven.


I will be the first one to admit, though, that I have been known to be caught with a spoon in hand and my head in the fridge, eating it straight from the bowl – though I promise I know it’s when I’m not sharing it!

Chocolate Pudding

Ingredients:
½ C. sugar
¼ C. cocoa (unsweetened powdered variety) – I accidentally used the Hershey’s Special Dark cocoa in one batch and LOVED it. But feel free to use the normal cocoa as well!
3 TBSP cornstarch
¼ tsp salt
2 1/4 C. milk (may use low fat or skim)
2 TBSP butter
1 tsp vanilla

Directions:
Combine sugar, cocoa, cornstarch, and salt in 8-cup glass measure. Gradually stir in milk, stirring until cornstarch is completely dissolved.

Cook on high (600 – 700 watts) for 7 – 10 minutes, stirring every 2 minutes. Stirring helps to keep the mixture smooth and to keep the milk from boiling over. Cooking is finished when mixture is cooked through and thickened. Stir in butter and vanilla. Pour into individual serving dishes. Cover with plastic wrap pressed down on pudding surface to prevent skin from forming over top. Refrigerate.

If you want it a little sweeter, use 2/3 cup sugar.
We use a 2 1/2 quart Pyrex bowl and don’t always put it into individual cups.

Friday, February 25, 2011

Polenta Bread

 I received this recipe from a coworker in November 2009, and it has taken me this long to make it! Sad, isn’t it? But I’m also glad I procrastinated, because I did not have a blog back then, and that means I couldn’t share this simple and delicious bread recipe with you! The inside is soft and tender, and the outside has a wonderful, golden crust. It was “practically perfect in every way” (Bonus points if you know the movie that is from!)

This bread is perfect for French toast, bread puddings, panini or even simply toasted with a slight smear of jam or butter. I loved it the first day when the crust was nice and crunchy, but I think the hubby liked it better on the second day, when the crust had softened up a little.

The only changes I made were that I added vital wheat gluten to my dough, and I used active dry yeast instead of the quick rise yeast. That just meant that I added my yeast to the warm water solution instead of to the dry ingredients.


Polenta Bread
From Simple Italian Cooking
(also on the Williams Sonoma Website http://www.williams-sonoma.com/recipe/polenta-bread.html)
Ingredients:
3 cups unbleached bread flour
1/2 cup finely ground, quick-cooking Italian
polenta, plus more for baking sheet
2 tsp. quick-rise yeast
1 tsp. salt
1 1/3 cups warm tap water
1 Tbs. extra-virgin olive oil
1 egg, beaten with 1 Tbs. water
Directions:
In a large bowl, combine the flour, the 1/2 cup polenta, the yeast and salt. Using a wooden spoon, stir to mix well. Add the warm water and olive oil and stir until all of the flour has been absorbed and a dough has formed.

Using your hands, gather the dough into a ball and transfer to a well-floured work surface. Knead the dough until soft and elastic and no longer sticky, about 10 minutes. Work more flour into the dough if needed to reduce stickiness; be sure to keep the work surface well floured. The dough should remain in a rounded shape and not flatten out when left on a work surface for a minute or two. If not, work a little more flour into the dough. Place the dough in a warmed, lightly oiled bowl, turning several times to coat it with oil. Cover with plastic wrap and let rise in a warm place until doubled in bulk, 45 to 75 minutes.

Sprinkle a little polenta on a baking sheet and set aside. Punch down the dough, return it to the lightly floured work surface and knead a few times. Form the dough into a round ball or an oval shape and place on the prepared baking sheet. The dough should retain its shape and not flatten out. Cover loosely with plastic wrap and let rise in a warm place until doubled in bulk, 30 to 40 minutes. While the dough is rising, position a rack in the middle of an oven and preheat to 425°F.

When the dough has risen, using a very sharp, thin-bladed knife or single-edge razor blade, carefully make a slash 1/2 inch deep across the top. Brush the surface with the egg mixture. Bake for 15 minutes. Reduce the oven temperature to 375°F and continue to bake until golden and crusty, 30 to 35 minutes more.

Transfer the loaf to a wire rack and let cool.
Makes 1 round or oval loaf; serves 6 to 8.

Tuesday, February 22, 2011

Mozzarella Sticks

My very first summer in the Midwest, before I started working, my then-boyfriend, now-husband decided it would be fun to go to the Wisconsin Dells for an extended weekend to get in our last summer kicks in before buckling down and joining the ‘real world.’


Before moving to Illinois, I had never heard of the Dells. The hubby would try to explain it to me, but nothing could prepare me for when we drove down the main street with water parks on either side, and having a military-grade Duck pull up beside us with its tour group in tow.


The trip itself was wonderful. We went on our very own Duck tour of the Dells, visited the water parks (including a ride on a water slide that was 10 stories tall), attended a magic show and went to the famous Tommy Bartlett Air and Water Show, they’re famous for the pyramid of water skiers.


We’ve been back to the area several times since then – but only once was it to visit the water parks. The other times we just happened to be passing though and had to make our obligatory stop at a famous local restaurant and micro-brewery called Moosejaw. According to the hubs, if you go to the dells, you go to this place to eat.


On my first visit, I knew that this place had to be good. There was a line out the door and around their porch. Thankfully we could camp out at the downstairs bar and had gotten there early enough that we were seated by the time we actually got hungry.


I have never had a better mozzarella stick than the ones they serve at Moosejaw. They’re prepared almost in an eggroll style, instead of the more traditional breading of other mozzarella sticks. And, maybe it’s because we were in Wisconsin, but the cheese was just worlds above any other stick I’ve ever had.


If we know we are passing through the dells on a trip, we will usually plan the timing so that we can stop at Moosejaw for a meal. I’m not a huge fan of mozzarella sticks, but these? These I can’t get enough of.


Since most days it just isn’t practical to drive 3 hours each way just for dinner, I’ve been experimenting with making my own mozzarella sticks to try and satisfy my craving. After a few batches, I have finally made something that works for us, even if it isn’t exactly like my beloved Moosejaw’s.


Mozzarella Sticks

Ingredients:
Package of Egg roll wrappers (20 in the package I used)
1 egg, slightly beaten with a tablespoon of water, until frothy
16 oz packaged Mozzarella (mine is shaped like a log, cut the log in half across the short width, and then each half cut into ten strips along the long direction.)

2 eggs
1.25 c Bread crumbs
1 Tbsp Dried oregano
1 Tbsp Dried basil
½ c grated parmesan

Directions:
To wrap the mozzarella:

Place an eggroll wrapper on the countertop with a point facing you. Place the mozzarella horizontally on the lower third of the wrapper.

Roll the corner closest to you over the filling. Moisten the top point with a little bit of the egg wash.

Fold the sides over the filling.

Roll the eggroll shut, and press to seal. Repeat with remaining wrapper and cheese.

I let these sit in my fridge for a little bit on a cooling rack in a sheet pan to let the egg really seal the seams well. Do not stack the mozzarella sticks – they will stick together!

For the breading:

Mix dry ingredients together in a medium bowl.

Pu the two eggs in a medium bowl and mix until mostly broken up and there are no clumps of egg white visible.

Using one hand. dip your wrapped mozzarella sticks in the egg wash, shake to remove the excess egg.

Drop into the breadcrumb mixture and, using your ‘non-eggy’ hand, coat the eggroll wrapper thoroughly with the breadcrumbs. Place back on the cooling rack until all the mozzarella sticks are breaded.

Meanwhile, I get my mini deep fryer heating to 375 degrees (you could also do this in a deep, wide pan with oil).

Once the oil gets up to temperature, fry the mozzarella sticks, 3-4 at a time, until golden brown. Remove to a paper towel to drain slightly.

Serve with marinara sauce, if desired.

Saturday, February 19, 2011

Bagels

Bagels are not new to me. I have made them before. Unfortunately, the results of my first batch were never worthy of sharing, an d I wanted to wait until I had a successful recipe.


To me, a good bagel is chewy, not dry and bready. My last attempt, while well-intentioned, might as well have been rolls with holes. They were not smooth and pretty on top like a bagel should be – they were lumpy and dull. When do the words ‘lumpy’ and ‘dull’ describe anything good?


See for yourself:

Not pretty.

I decided to give it a try again when I saw a new recipe that called for a sponge starter, instead of just starting out with regular bread dough. I let the sponge sit overnight, and then made the bagels the next morning. It was so fun to knead this dough because I could really feel the glutens activate and relax, and what started off as a shaggy dough turned soft and supple.


The last time I tried to make the holes in the bagels, I had the worst time keeping the edges even. Some spots would be really thick, and others would be super thin. I made a conscious effort this time around to avoid that problem and, for the most part, I succeeded.


When I boiled the bagels, I got a little worried because again they looked slightly lumpy after existing their water bath. I prepared myself for disappointment, but at least they only had to bake for 10 minutes before I could find out if the recipe worked.


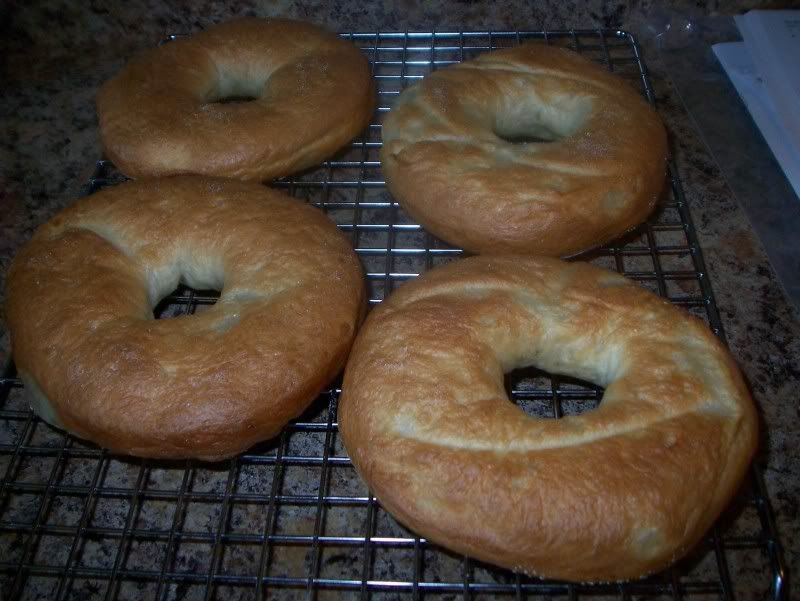
In the oven, the slightly lumpy exterior magically vanished, and a smooth, slightly glossy surface emerged on the top of each bagel. After ten minutes, I pulled perfectly golden brown bagels out of the oven. They looked like bagels, but I still was holding out on a verdict until I got a taste of one.


This recipe was a winner. These bagels were heavenly. Slightly chewy, with a thin, soft, shiny exterior crust – I have had one pretty much every day since making them (they make great sandwiches!)


Next time I’m trying a cinnamon-raisin version – as requested by the hubby. I can’t wait to make these again!


Peter Reinhart’s Bagels


Adpated from The Bread Baker’s Apprentice - As written on Smitten Kitchen's Website
Makes 1 dozen bagels

Yield: 12 extremely large, 16 regularly large or 24 miniature bagels

Sponge
1 teaspoon instant yeast
4 cups unbleached high-gluten or bread flour (see note below)
2 1/2 cups water, room temperature

Dough
1/2 teaspoon instant yeast
3 3/4 cups unbleached high-gluten or bread flour
2 3/4 teaspoons salt
2 teaspoons malt powder or 1 tablespoon dark or light malt syrup, honey, or brown sugar (see note below)

To Finish
1 tablespoon baking soda
Cornmeal or semolina flour for dusting

Day one: To make the sponge, stir the yeast into the flour in a 4-quart mixing bowl. Add the water, whisking or stirring only until it forms a smooth, sticky batter (like pancake batter). Cover the bowl with plastic wrap and leave at room temperature for approximately 2 hours, or until the mixture becomes very foamy and bubbly. It should swell to nearly double in size and collapse when the bowl is tapped on the countertop.

To make the dough, in the same mixing bowl (or in the bowl of an electric mixer), add the additional yeast to the sponge and stir. Then add 3 cups of the flour and all of the salt and malt. Stir (or mix on low speed with the dough hook) until the ingredients for a ball, slowly working in the remaining 3/4 cup flour to stiffen the dough.

Transfer the dough to the counter and knead for at least 10 minutes (or for 6 minutes by machine). The dough should be firm, stiffer than French bread dough, but still pliable and smooth. There should be no raw flour – all ingredients should be hydrated. The dough should pass the windowpane test and register 77 to 71 degrees F. If the dough seems to dry and rips, add a few drops of water and continue kneading. If the dough seems tacky or sticky, add more flour to achieve the stiffness required. The kneaded dough should feel satiny and pliable but not be tacky.

Immediately divide the dough into 4 1/2 ounce pieces for standard bagels, or smaller if desired. Form the pieces into rolls.

 Cover the rolls with a damp towel and allow them to rest for approximately 20 minutes.

Line 2 sheet pans with baking parchment and mist lightly with spray oil. Proceed with one of the following shaping methods:

Method 1: Poke a hole in a ball of bagel dough and gently rotate your thumb around the inside of the hole to widen it to approximately 2 1/2 inches in diameter (half of this for a mini-bagel). The dough should be as evenly stretched as possible (try to avoid thick and thin spots.)

Method 2: Roll out the dough into an 8-inch long rope. (This may require rolling part of the way and resting if the pieces are too elastic and snap back, in which case, allow them to rest for 3 minutes and then extend them again to bring to full length. Wrap the dough around the palm and back of your hand, between the thumb and forefinger, overlapping the ends by several inches. Press the overlapping ends on the counter with the palm of your hand, rocking back and forth to seal.

Place each of the shaped pieces 2 inches apart on the pans. Mist the bagels very lightly with the spray oil and slip each pan into a food-grade plastic bag, or cover loosely with plastic wrap. Let the pans sit at room temperature for about 20 minutes.

Check to see if the bagels are ready to be retarded in the refrigerator by using the “float test”. Fill a small bowl with cool or room-temperature water. The bagels are ready to be retarded when they float within 10 seconds of being dropped into the water. Take one bagel and test it. If it floats, immediately return the tester bagel to the pan, pat it dry, cover the pan, and place it in the refrigerator overnight (it can stay in the refrigerator for up to 2 days). If the bagel does not float. Return it to the pan and continue to proof the dough at room temperature, checking back every 10 to 20 minutes or so until a tester floats. The time needed to accomplish the float will vary, depending on the ambient temperature and the stiffness of the dough.

The following day (or when you are ready to bake the bagels), preheat the oven to 500 degrees F with the two racks set in the middle of the oven. Bring a large pot of water to a boil (the wider the pot the better), and add the baking soda (and optionally, a few tablespoons of barley syrup). Have a slotted spoon or skimmer nearby.

Remove the bagels from the refrigerator and gently drop them into the water, boiling only as many as comfortably fit (they should float within 10 seconds). After 1 minutes flip them over rand boil for another minute. If you like very chewy bagels, you can extend the boiling to 2 minutes per side. While the bagels are boiling, sprinkle the same parchment-lined sheet pans with cornmeal or semolina flour. (If you decide to replace the paper, be sure to spray the new paper lightly with spray oil to prevent the bagels from sticking to the surface.) If you want to top the bagels, do so as soon as they come out of the water. You can use any of the suggestions in the ingredients list or a combination.

When all the bagels have been boiled, place the pans on the 2 middle shelves in the oven. Bake for approximately 5 minutes, then rotate the pans, switching shelves and giving the pans a 180-degree rotation. (If you are baking only 1 pan, keep it on the center shelf but still rotate 180 degrees.) After the rotation, lower the oven setting to 450 degrees F and continue baking for about 5 minutes, or until the bagels turn light golden brown. You may bake them darker if you prefer.

Remove the pans from the oven and let the bagels cool on a rack for 15 minutes or longer before serving.

Monday, February 14, 2011

Cody Wants to Say Something...

Cody wanted to share a little something with you for Valentine's Day.


Enjoy!


Roses are red
Violets are blue
Don’t forget your corgi -
Please be my Valentine, too!
I know I may nip
And sometimes I smell
But please know that I love you
I hope you can tell!
I can’t buy you flowers,
And chocolate’s out, too
I can’t sign a card
Or buy a dozen balloons
But I can give you cuddles,
And make you laugh when you’re down
I will gladly give kisses
And just be a clown
And when I lick you all over
Know I’m just trying to say
I love you all bunches 
And Happy Valentine’s Day!

Macarons!

Happy Valentine’s Day!
I may not have a red treat to share with you today, but I definitely feel like this little macaron is fitting to share today. Just as relationships require love and devotion, this cookie demands the same. The reward? A beautiful, delicate cookie that has me head-over-heels.

Just like a first date is met with anxious excitement, cracking and separating the eggs made me daydream into the future and of what could be, if I only iave them a chance.

Then there is the dreaded ‘no calling for three days’ rule. A time when you can do nothing but wait, planning your next move without actually following through on it. Aging the egg whites in this recipe is important, most likely because the water that evaporates leads to a denser concentration of protein bonds in the egg whites, creating a stronger, more forgiving shell. My egg whites had been sitting and aging in my fridge for days as I tried to muster up the courage to make these little beauties. I have read about the headaches and heartaches many a baker has had over these delicate little treats, so I will admit I was a little worried about how they would turn out.

Onto the second date. You’re feeling a little better about the whole situation, but still some uncertainty remains as to whether this could blossom into something more, or whether the love affair will fizzle out as a dry, cracked, feetless failure.

I mixed with a firm but loving hand, incorporating the ingredients just enough that they could be piped onto the sheet. They piped out beautifully, and I then let them sit on the counter for an hour so that the cookies could get a slight skin on top prior to baking..
But, the true test of any relationship is a trial by fire. Into the oven they went at 280 degrees, as I watched like a hawk to see if the cookies would blossom into something beautiful, or have an epic meltdown on the baking sheet.

I’m pretty sure it was about minute 7 into the baking time, I noticed that little feet were forming! I was about two seconds away from channeling my best Dr. Frankenstein and yelling “IT’S ALIIIIIVE!” but then realized how nuts I might actually look to my hubby, who, I’m sure at times, is already questioning how much remaining sanity I actually have.

Ok, so I squealed. And made him come over and look in the oven window with me as I pointed out the feet. And, like a good husband, he smiled, nodded and then went back to what he was doing.

Once they came out of the oven and cooled, I paired them as closely as I could with a suitable ‘cookie mate.’ Since I did not draw any stencils or templates for the cookies – maybe I did not have faith that I’d get as far as I would to actually pipe them out and bake them – I freehanded all the cookies and some were much more, uhm, generously piped than others. Oddly enough, I ended up with a mate for every half, so it worked out in the end. Fate must have had a hand in the matchmaking.
After filling them with ganache and letting them set up, I finally tried one.

And, I see what the fuss is about. The delicate top shell gives at the first bit of resistance, and yields to a soft, slightly chewy meringue-like center. The natural almond flavor is perfect, and cannot compare to anything flavored with artificial extracts. It is the perfect marriage of chocolate and almond flavors and is luscious and glamorous without being too rich.

I am so excited to make these again and am no longer intimidated by the legendary macaron!


I think this is going to be the beginning of a beautiful relationship.


Happy Valentine’s Day to you and yours!


If you want to see the full post on Bakerella’s website (which is where I got the recipe I used) go here. Otherwise, here is an abridged version of the overview, and the recipe.


Ingredients

90 g (approximately 3 egg whites, from large eggs), aged 1 day at room temperature or three days in the fridge, covered
110 g Ground almonds
2 Tbsp granulated sugar
200 g Confectioner’s sugar

Directions

Whip the egg whites until they are foamy. Gradually add 2 tablespoons granulated sugar until you have a glossy meringue. Don’t overbeat.
Place ground almonds and powdered sugar in a large bowl
Add your whipped egg whites to the almonds and powdered sugar and fold. You don’t have to fold too gently, but you don’t want to over fold either.
If you want to color them, add the powdered food color about halfway through folding.
When the batter is ready, pour it into a large pastry bag with the tip inserted. It will ooze out the end, so keep the bag folded or you can crimp the bottom until you are ready to pipe. (a #807 tip was recommended, but I just used the largest round piping tip I had – and it worked just fine)
Then make small piped circles on a baking sheet lined with a silicon mat or parchment paper. (You could draw circles on the ‘wrong side’ of the parchment paper to use as a template if you’re like me and can’t make similar sized circles to save your life)
Once your tray is filled, let it sit for about an hour to harden the outer shell before baking.
Bake at 300F for 18-20 minutes in a regular oven or 280 F if you have a convection oven
Let them cool. If you can’t get them off the sheet, another tip I used was to run cold water in between the parchment paper and the baking sheet. My cookies popped right off after doing that, and I didn’t splash a single cookie with water!
And you can whip up some ganache or buttercream for the filling. Or just fill with a fruit jam.

Linked up to:

Friday, February 11, 2011

Meatloaf

I’m in the midst of a deep freeze here in Chicago. If it’s not snowing, it’s icy. We've had days where the wind chills are in the 20-below-zero range. We've had Snowmageddon. And I have had a bottle of water that was accidentally left in my car freeze solid.

On days like these, I refuse, kicking and screaming try to avoid leaving the warm embrace of my fleecy blanket, cuddled up on the couch watching a movie, Say Yes to the Dress, or Top Chef all while eating anything and everything I can get my hands on that will make me feel the slightest bit warmer!


As a kid, I turned my nose up at meatloaf, I always saw it as a ‘mystery meat’ platter. I don’t even recall whether I gave the poor slice of meat on my plate a chance before I tried to hide it in an air vent, or spread it around on my plate so that it looked like I at least tried some. Once I realized it was essentially a nicely seasoned, moist hamburger formed into a loaf, my prejudice vanished.


Few things are as easy or as comforting on a cold, snowy day than meatloaf. And, thankfully, this recipe is so easy, most people will have everything they need right in the freezer, fridge and/or pantry. If you don’t want to make two loaves, halve the recipe and make it in a single loaf pan. I usually make both loves, mainly because it freezes so well and if I can get two meals out of one prep period, I am going to do it.


This went perfectly with a side of parmesan garlic mashed potatoes, and sprinkled with just a bit of parsley.


Meatloaf

4 slices of bread, cut or torn into ~1/2” cubes
2 eggs
3/4 c milk
1 Tbsp Worcestershire
1/4 c celery
1/4 c onion
1/8 tsp pepper
1/4 tsp salt
1 1/2 tsp poultry seasoning
1 1/2 lb ground beef
1/2 lb ground pork

Glaze
¼ c ketchup
2 Tbsp light corn syrup

Directions
Preheat oven to 350 degrees F.

In a large bowl, soak bread crumbs in milk.

Add egg and beat with a hand mixer until well combined and few/if any chunks of bread remain.

Add celery, onion, Worcestershire, salt, pepper and poultry seasoning. Mix well.

Add beef and pork and mix gently but thoroughly.

Divide meat mixture in half and form into two loaves in two separate loaf pans or in one 8” x 8” pan.

Bake for 1 hour.

For the topping, mix together ketchup and corn syrup in a small bowl.

After 1 hour, top with ketchup/corn syrup mixture and bake for an additional fifteen minutes.

Serve.


Tuesday, February 8, 2011

SnOMG...

I thought it would be fun to (now that we're mostly dug out!) To show you what we got hit with last week during the third biggest snowstorm in Chicago's recorded history.


O'Hare airport recorded 20.2" of snow, and we had wind gusts up to 60 miles per hour, making visibility practically nothing, and creating massive snowdrifts like I have never seen.


Streets were closed, trains were stopped, the city practically stood still for two days. Cars were abandoned on Lake Shore Drive. It was absolutely unbelievable. Have you seen Thundersnow? A thunder/lightning storm within a snowstorm. Scary, yet incredible.


I will admit, as crippling as the storm was, it was exciting to finally be a part of Chicago's history. I can now say that I was in the Blizzard of 2011, which is in Chicago's record books. I feel a little more like a true Chicagoan now!


We got up Wednesday morning at our normal time (5 am - ugh!) just to make sure things were not blown out of proportion and to check if it was really possible to get to work or not. After looking out the bedroom window, we decided it would be best just to stay home, and the hubby and I went back to sleep. I was still feeling a little guilty, thinking that it really didn't look that bad from the window, and maybe I could have made it to work.


My guilt quickly passed, though. When I woke up around 730-8am, I decided to finally take a look outside and really see what we were dealing with. I opened my front door, and was greeted with snow, inside the house!
Our storm door apparently blew open sometime during the night courtesy of our wind gusts and snow drifted inside our house, making opening our door impossible.


Our back door and deck were in even worse shape, so our only choice was to exit our house through the garage. The hubby and I stood inside the garage and pressed the button to open the door, not knowing what we'd find.


We both gasped when we saw the gigantic snow drift that had amassed in front of our garage.
We finally got outside the house, and I couldn't help running around and snapping pictures. I must have said 'This is absolutely insane' about half a dozen times. I couldn't believe it. You can barely see the cars in our garage!
At least now I can see why we couldn't get out the door. The snow had drifted nearly half of the way up the outside of the door - not to mention our little 'snow present' inside the house!
And, like a little kid, I couldn't help myself, I had to run around and see just how deep it was. My legs are totally gone. (And then my boot got stuck, making it nearly impossible to get out of the pile!)
Our poor dog had to wait for us to shovel at least a small path for him to get outside, and even that didn't help. It was snowing and blowing so hard, he could barely see, much less stand up to do his business.
Mommy - get me out of here!
He had quite enough of the snow - granted we were pretty much throwing him in the snow drifts and saying 'have fun!' we knew better than to go in there! But once I got in there with him, he had a good old time. He followed me around, and ran through my boot tracks.
I think he really enjoyed having someone to play with in the snow, he even posed like a champ for a couple of pictures, but I'm sure he had to have been freezing.
And he found some of the shallower areas of snow that he could see over! But as soon as he found one of those, he'd disappear into a huge snowdrift we didn't see!
And used me as a 'snow raft' so that he didn't have to run through the snow. Instead he used me to keep him safely above the drifts.
About twenty minutes of playing in the snow, and we were both exhausted. Which is good for Cody, because we had to put him in his crate so that we could start digging ourselves out.
By the time we were finished, it had taken us nearly four hours to clear our driveway and our sidewalks. Cody liked where the snow blower had gone, because the snow compacted enough to support his weight - I think this is the tallest he's ever been (and the snow is taller than he is!)
If the 20+ inches we got that on February 2nd wasn't bad enough, Saturday February 5th greeted us with about 3 more inches. That accumulation is more Cody's pace, so I had a fun time with him in the morning playing in the fresh snow!
After all the snow and all the effort to dig out, the hubby and I were exahusted (and Cody, too!) But then I looked out the window, and the sunset over the snow was absolutely beautiful. I was so happy I got to see that, because after all that work and all that pain, I was truly reminded how beautiful it all actually is.
It's been almost a week, and things are finally getting back to normal. Public transportation is mostly back on schedule, the cars have been reclaimed from Lake Shore Drive, and we can finally drive on most of the streets (even if all the lanes aren't open)

Even with all this snow, the hubby and missed only one day of work, and that was only because it was physically impossible to get out of the house.

Ok Puxatawny.. you said it's going to be an early spring. I'm holding you to that.

Or else I'm never trusting another groundhog ever again.

Pulled Pork

If you hand me a plate of any type of slow-cooked meat, you can be pretty sure I’ll polish off the entire thing. Pit beef, ribs, brisket, pot roast and especially pulled pork. We have a few good barbecue restaurants by us but, even so, I like having the option of making it at home some days. I think I also feel better because I trim most of the fat off of the roasts before slow-cooking them, and I know exactly what is in my spice rub. I can tailor the rub to suit our personal tastes, and the leftover pork freezes perfectly for another, even faster meal in the future.

Making delicious pulled pork at home is easier than most people think. You can slow cook it in your oven at about 220 degrees as per the original recipe, but I use my crock pot. I feel a lot safer leaving for work with my pork roast in a crock pot instead of leaving my oven on all day. I’ve tried several different spice rubs, both homemade and pre-packaged, and my husband and I both agree that the current mix I’m using is a winner to both of our taste buds. The cinnamon adds unique, but subtle warmth to the pork and a little punch that really accentuates the natural flavors nicely.
We use a bottled sauce because we have yet to find a recipe we both like as much as Famous Dave’s Rich and Sassy sauce, a variety of Open Pit sauces or KC Masterpiece’s options. I may have to try the recipe my parents were raving about from the Neely’s on Food Network, but sometimes, especially on a work night, simple is better. It takes practically no time at all to get the pork seasoned and in the crock pot, and after cooking all day, the shredding process is incredibly easy, the pork practically falls apart before I can get to it with a fork.
A few buns, some sauce, and we’re in business. With a good sauce, this pork doesn’t need much else. If you really wanted to sauté some veggies to put on your sandwich, you could easily do that, but I like mine plain. And if pulled pork isn’t classy enough, we really like to up the ante with a side of tater tots.
If that doesn’t convince you to give it a try, think of this – at one of our local barbecue places, a barbecue pork sandwich for lunch costs $5.49. This recipe yields about six servings. The picnic roast (or pork butt/shoulder) was 8 dollars for about 3 pounds, buns were about 50 cents each at our grocery store bakery and the barbecue sauce was 6 dollars (but of course we didn’t come close to using all of it). Assuming you already have the other ingredients in your pantry, this meal costs approximately $2.83 per sandwich. For six servings, that’s a savings of just under 16 dollars. It may not seem like much, but add that up over a period of time, and you could have some pretty serious savings. I think it makes the sandwich taste that much better when I realize just how much we can save making some of our favorite restaurant foods at home.

Try it out, you won’t regret it!
Pulled Pork Sandwiches
Serves 4

Adapted from
Chocolate Shavings

Ingredients
3 lbs of pork Shoulder, or pork butt
1 tablespoon of paprika
A pinch of ground cinnamon
1 teaspoon of onion powder
1 teaspoon of kosher salt
1/4 teaspoon of freshly ground pepper
1/2 cup of low sodium chicken stock
2 bay leaves
Small ciabatta breads
1/2cup of your favorite barbecue sauce

Directions
In a small bowl, add the paprika, onion powder, cinnamon, salt and pepper. Using your hands, rub the mixture on all sides of the pork. Set to marinate in the fridge for an hour.

Place in a slow cooker. Add chicken stock. Cook on low setting for 6 to 8 hours, until the pork is very tender.

Remove the pork from the slow cooker and discard the remaining liquid. Shred the pork using a couple of forks. Place the meat back in the slow cooker along with the barbecue sauce and continue to cook for another 20-30 minutes until the pork is hot again. Serve on buns with extra barbecue sauce.

Enjoy!

Sunday, February 6, 2011

A Plate Full of (Brownie) Pigskins!

This is super simple for a Super Bowl Party!

A box of brownie mix - made using the directions for a 'fudgy' brownie. Bake and let cool.

Cut off the edges (about 1/2 inch on each side - that's your pieces to sneak and eat!) Cut the rest into 20 pieces. Taking one piece at a time, form into football shapes and lay on a sheet pan until all of them are formed.

Cover with plastic wrap and let chill in the fridge for 20 minutes or so.

Prepare a sheet pan or flat surface with parchment paper.

Following the directions of your candy melts, melt chocolate candy melts and cover with chocolate. Place on parchment paper to set up.

While cooling, melt white candy melts. Place into piping bag with a small circular tip and pipe on the laces.

And there you go!

Simple, easy and delicious dessert for a last-minute Super Bowl treat! (Or, for any other time during the football season!)

Friday, February 4, 2011

Ham and Cheddar Stuffed Pretzel Bites

With a few days to go before the Super Bowl, I wanted to share a recipe that will please any guest at your Super Bowl party, football lover or not. Step aside, churros. Move out of the way, nachos. When it comes to foods fit for game day, the soft pretzel wins my heart over every single time. But stuffing the soft, bite-sized nuggets with ham and cheddar – that sends me over the moon.

I think a lot of my soft pretzel love is due to the fact that they are so versatile. They can be eaten plain, savory or sweet, or be dipped in pretty much anything your heart desires. And when you’re at the stadium, you just ring it around your finger and still carry two or three drinks back to your seat.

In Baltimore, a popular appetizer is a king-sized soft pretzel, smothered in crab dip, covered in cheese and then baked until hot and melty. I have gotten that as my dinner on more than one occasion. Even now, the pretzel world is expanding into stuffed pretzels, proving that there are even more options than ever. One of the more well-known brands I’ve seen are Kim and Scott’s http://www.kimandscotts.com/ stuffed pretzels. They have both sweet and savory varieties of stuffed pretzels, from chocolate pretzels stuffed with fudge, cinnamon-sugar topped pretzels stuffed with apple pie filling, and cheese-topped jalapeño-cheese stuffed pretzels.

Hands down, my favorite pretzel is traditional German Bavarian pretzels, which are difficult to find outside of Oktoberfest celebrations here in the US. The pretzels in German beer gardens are the best I’ve ever had. Instead of trying to replicate a perfect plain pretzel, I figured I would spice things up a bit. I decided to make my usual pretzel dough, stuff them with ham and cheese and make little nuggets out of them. They are a perfect, portable appetizer, suitable for hot or room-temperature consumption.


I also decided to have some fun and make an actual pretzel-shaped pretzel as well as one stuffed with ham and cheddar, in the style of those Kim and Scott's pretzels – just to see what would happen. The regular one was easy to roll into a tube and then create the pretzel knot. The stuffed one was a little more complicated, but was definitely worth the wow-factor.


These were fantastic. The outside could have had a little bit of a thicker crust, but it was not a fatal flaw. I did notice, though, that the longer pretzels sat at room temperature, the more of the salt seemed to dissolve into the outer skin. When eating the pretzel, it would have the correct level of saltiness, but it was missing the crunch that the pretzel salt brings. Which means I will either be investing in some pretzel salt, or eating the pretzels faster. Probably eating them faster, knowing me.


Ham and Cheddar Stuffed Pretzels

Pretzel Dough Recipe from Alton Brown via FoodNetwork.com
About 5 dozen pretzel bites or 8 regular pretzels (or be crazy and do a combination of both!)

My adaptations to this basic recipe are in italics.

Pretzel Dough
1 1/2 cups warm (110 to 115 degrees F) water
1 tablespoon sugar
2 teaspoons kosher salt
1 package active dry yeast
22 ounces all-purpose flour, approximately 4 1/2 cups
2 ounces unsalted butter, melted
Vegetable oil, for pan
10 cups water
2/3 cup baking soda
1 large egg yolk beaten with 1 tablespoon water
Pretzel salt

Filling
8 oz cheddar, shredded
8 oz deli ham, cut into small pieces or pulled apart


Combine the water, sugar and kosher salt in the bowl of a stand mixer and sprinkle the yeast on top. Allow to sit for 5 minutes or until the mixture begins to foam. Add the flour and butter and, using the dough hook attachment, mix on low speed until well combined. Change to medium speed and knead until the dough is smooth and pulls away from the side of the bowl, approximately 4 to 5 minutes. Remove the dough from the bowl, clean the bowl and then oil it well with vegetable oil. Return the dough to the bowl, cover with plastic wrap and sit in a warm place for approximately 50 to 55 minutes or until the dough has doubled in size.

Preheat the oven to 450 degrees F. Line 2 half-sheet pans with parchment paper and lightly brush with the vegetable oil. Set aside.

Bring the 10 cups of water and the baking soda to a rolling boil in an 8-quart saucepan or roasting pan.

In the meantime, turn the dough out onto a slightly oiled work surface and divide into 8 equal pieces.

For the individual pretzels, roll one of your eight pieces into a rope about 24 inches long. Twist into a pretzel shape, set aside. To stuff the pretzel, roll one of your eight pieces into a rope about 24 inches long, and then flattened out to about an inch wide. Run 1 oz of cheese and 1 oz of ham up the middle of the flattened dough, and then pinch the dough shut around the filling, trying to remove as much excess air as possible from the inside. Then the dough can be carefully knotted into the classic pretzel shape. Make a U-shape with the rope, holding the ends of the rope, cross them over each other and press onto the bottom of the U in order to form the shape of a pretzel. Place onto the parchment-lined half sheet pan.

For the nuggets, divide each of the eight pieces into another eight pieces. Make each piece into a small circle, about one to 1-1/4 inches in diameter. Also, try to make the outer edge of the nugget a little thinner than the center of the disk, since you’ll be gathering it. Put about 1-2 tsp of cheese and the same amount of ham in the center of the disk. A small pinch will do, be careful not to overfill the nugget or else it will be hard to pinch shut and will ooze cheese everywhere when it boils and then bakes. Gather the edges of the circle and pinch shut into a ball shape.


Place the pretzels into the boiling water, 1 by 1, for 30 seconds. This gets a little complicated with the nuggets, but do the best you can. I did batches of three to four nuggets at a time. Remove them from the water using a large flat spatula. Return to the half sheet pan, brush the top of each pretzel with the beaten egg yolk and water mixture and sprinkle with the pretzel salt. Bake until dark golden brown in color, approximately 12 to 14 minutes. Transfer to a cooling rack for at least 5 minutes before serving.
Related Posts Plugin for WordPress, Blogger...