
 Growing up within a short drive from the Pennsylvania Dutch communities, my family would often take trips to their markets for baked goods, sausage, breads and other specialty items. I have yet to find anything available there that isn’t amazing (maybe because of all the butter and lard in the recipes!) but their baked treats and candies take the figurative cake. The other fun thing about these markets is that they still make certain foods that you can’t find anywhere else, especially treats that my parents and grandparents grew up with.
Every time we go to the market, we’ll pick up a small bag of a confection called Clear Toy candy. It’s essentially a hard sugar candy that they either have loose in a bag or on sticks as lollipops. My grandfather fondly remembers growing up with the candy, so we’ll always bring him some back. This recipe caught my eye a little bit ago, because it seemed to embrace the Clear Toy candy spirit, even if it’s not exactly the real thing. Aside from being slightly dangerous with the boiling sugar mixture, it’s an easy recipe, a batch of candy took me about 45 minutes total.
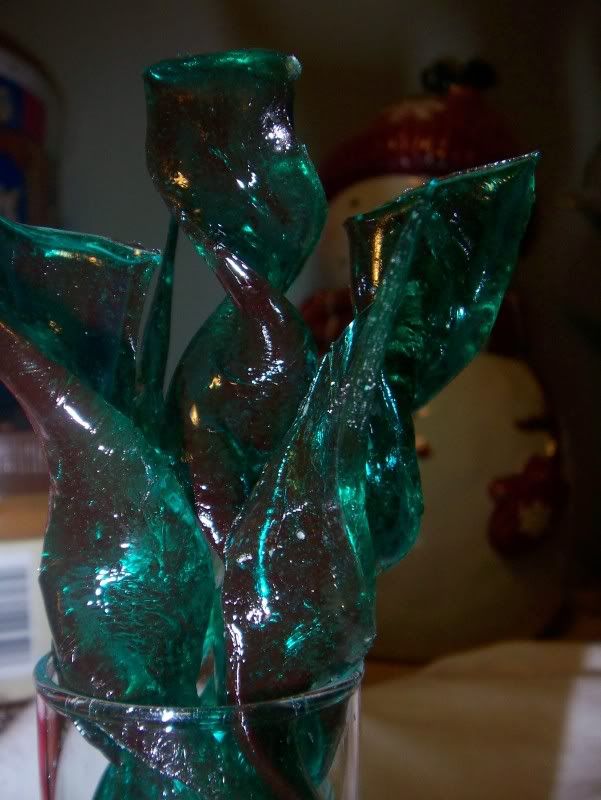
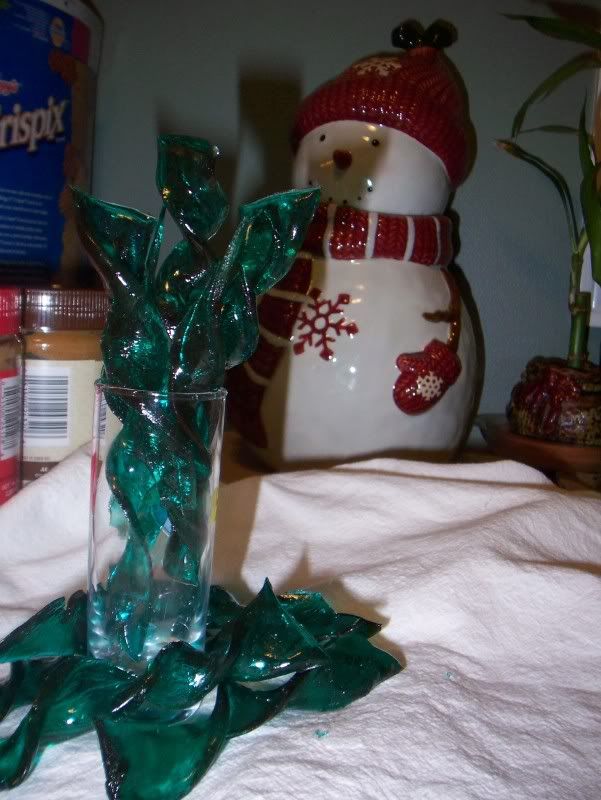
These set up beautifully, and hold their shape well. I will also mention that they shatter like broken glass into a million-and-one pieces if dropped on the floor.
If candy recipes requiring specific temperatures and candy thermometers intimidate you, I’d suggest giving this recipe a try. And if you don’t want to handle the hot sugar to twist into icicles, you could always pour the hot mixture onto the cookie sheet, let the puddle set, break it up into bite-sized pieces and package them in little gift bags as “Ice Shards” instead of “Icicles.” Rustic is beautiful, too.
Next time I’ll use a little less food coloring, but other than that, the recipe is wonderful as is.
Curious about what I’ve made already? Check out:
White Trash
Quick Mix Spritz Cookies
Adapted from LorAnn Oils, originally seen on SprinkleBakes .
12-15 pieces
1 cup granulated sugar
1/2 cup light corn syrup
1 tsp flavoring oil such as peppermint or blueberry
Blue food coloring
Preheat oven to 185 degrees. Spray a cookie sheet and large knife with cooking spray (I found that a pizza cutter worked very well in place of the knife).
In a 4 cup glass measure, mix sugar and corn syrup together until a thick, uniform paste forms. Cover with plastic wrap. Microwave on high for 3 minutes 15 seconds. Quickly stir mixture and cover with a new piece of plastic wrap. Microwave for another 3 minutes 15 seconds. Remove from microwave and stir with a clean spoon. After the mixture stops boiling, add the food color and flavoring. The cooked candy mixture will have a golden appearance, so when you add the blue food coloring you will get a blue/green (turquoise) color result.
Pour melted candy onto the prepared pan. Tilt the sheet to spread the candy to a 6x8 inch puddle. As the sugar starts to set (one or two minutes after pouring) cut candy into 1/2 x 4 inch strips. Remove one strip and twist gently. Allow to cool on wire rack. Repeat with remaining pieces. To keep the candy malleable, place in the oven for 1-2 minutes. You may prefer to keep the cookie sheet heated and work out of the oven.
*This recipe is meant to be prepared in a standard household microwave (600-700 watts). Mini microwaves and commercial microwaves are not recommended.
*Please use caution when making this recipe. Candy mixture is extremely hot when in liquid state.
*Be careful when adding you extracts and food coloring, the hot sugar mixture will cause it to bubble up, so stand back when adding, to make sure you aren’t hit with any splatter.
5 comments:
Caroline, This candy is beautiful!
I love your memories and the history that goes along with them. That always makes the recipe more special, imo.
Thank you so much for sharing! xo~m
Mari, Thank you so much for the compliment - means a lot coming from someone like you! I cook because I love the memories it evokes, and I'm glad I get the chance to share them with other people. I really get a lot of joy out of that.
Oh my goodness these are gorgeous! I'm absolutely terrified of hot sugar so I'm not sure I'd ever be brave enough to make these, but you make it sound so easy! I'll definitely bookmark the recipe.. maybe I'll work up the courage someday!
And as for the question about the meringues you left on my post, I just use a large star piping tip (The same one I use to frost my cupcakes) to pipe them out. And trust me, they weren't all perfect.. lol I just picked the pretty ones out for the picture!
Thanks so much! And thank you for sharing the recipe, I wouldn't have found it if it wasn't for you!
Danae - Even just picking the pretty ones, I wouldn't have had even one to photograph, looks like you had dozens! I appreciate the compliment on my candies! I think I'm lucky to have "asbestos hands" for the most part, but working out of the oven with these is my saving grace; the oven on low keeps them perfectly pliable without blistering your fingers!
Post a Comment