Saturday, January 29, 2011

Pizza Chicken Roll-Up

A surefire way to get out of a dinner rut is to think of some of your favorite meals, and then finding a way to use that flavor combination in a new way. One particular night, dinner ideas were impossible to come by. We wanted chicken, but couldn’t figure out if we wanted lemon pepper chicken, chicken and mushroom soup with couscous, chicken cordon bleu or something totally different. I knew we had some gruyere cheese in the fridge I didn’t want spoiling, so I asked if I could do a chicken roll-up in the spirit of a pizza. I no way proclaim that I am a pioneer in the kitchen in terms of the idea behind this dish, stuffing and rolling chicken is by no means a new idea, but I am very happy how this turned out, and it was something out of the norm for us.

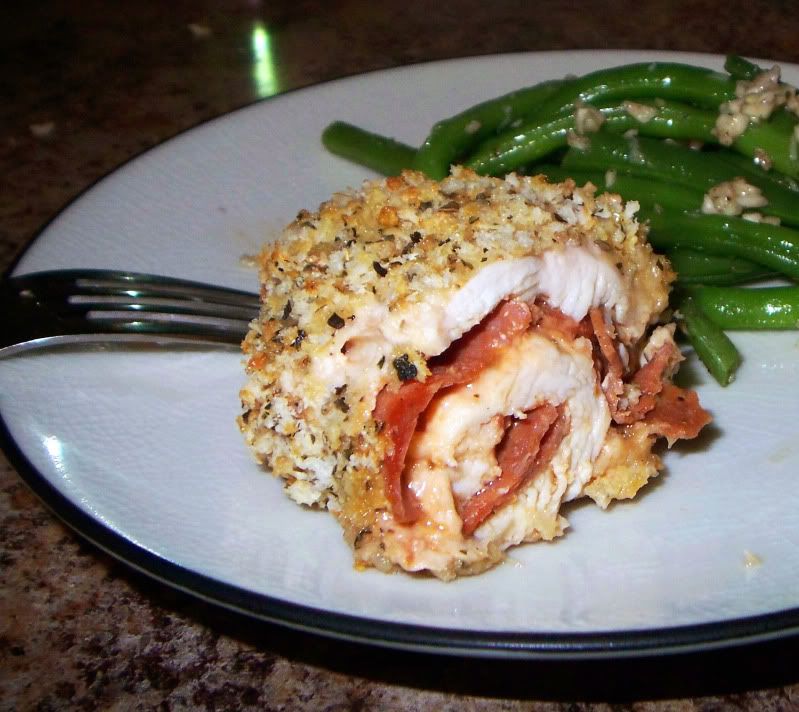
And it actually looked interesting when it came out of the oven. But the important part was it tasted good. Success in the kitchen!

A couple of tips for pounding chicken thin:
1. Make sure your chicken is totally, thoroughly and completely thawed. Pounding out partially frozen chicken will make it fall apart even easier. Believe me, I know. And falling apart chicken is really hard to roll up.
2. Put plastic wrap on your cutting board, lay down your chicken, and then put another piece of plastic wrap on top.
3. Spritz a little water on top of the plastic wrap. This reduces the friction between your mallet/pan/brick/pounding utensil and the plastic wrap so you can more easily do step 4.
4. Instead of pounding straight up and down, hit the chicken with a diagonal downward force in the direction that you want the chicken to ‘stretch’ – so to speak. This will gradually pound the chicken down and out, instead of making it mush beneath your mallet.

Chicken Cordon Bleu meets Pizza

Our chicken breast was large enough that with all the stuffing, it was enough to serve both of us. You can easily adjust this recipe to feed more or less.

Ingredients
1 large chicken breast, pounded to ¼ inch thick
1/4-1/3 c tomato sauce
Pepperoni
1/4-1/3 c cheese of choice – I used gruyere
1/2 c panko breadcrumbs
3 Tbsp parmesan cheese
2 tsp Italian seasoning
1/4 c flour
1 egg, lightly beaten

My chicken breast fell apart a bit when it was pounded out, so mine was terribly messy – if you try it, yours probably will be, too. But it is delicious.

Preheat oven to 350 degrees.

Lay out the flattened chicken breast out, and spread on the sauce.

Sprinkle with grated cheese of choice and top with pepperoni.

Roll chicken breast and secure with toothpicks.

Mix breadcrumbs, Italian seasoning and parmesan in a bowl. Set aside.

Dredge chicken roll in the flour, shake off excess. Dip it into egg and then coat thoroughly with parmesan/panko mixture.

Place seam side down in a baking pan and bake for 20-25 minutes or until cooked through

Tuesday, January 25, 2011

English Toffee

Side note: Engineer and an Oven is now on Facebook! Stop by and say hi! If you like what you are seeing here, please be sure to 'Like' my page and share it with your friends!

You can find me here:
Engineer and an Oven

Thanks!


Now back to your regularly scheduled program.

Cooking sugar seems to be a bit of a complicated thing for me. Ever since we got our new range, I always miscalculate how high the heat on our stovetop actually is compared to what I would expect based on my old oven. Paula’s recipe says to cook the sugar mixture over medium-high heat until it reached 300 to 310 degrees F. In under ten minutes, my medium-high heat scorched my sugar mixture around the edges, and rendered my first batch inedible. Don’t think for a minute I didn’t try to salvage the mixture. I hate letting effort go to waste, so I figured I could still coat it with chocolate and it would mostly hide the burnt taste. I will go on record saying that was a flop, and not only had I wasted some butter and sugar by burning it, I now wasted a good bit of chocolate trying to hide it. Into the trash that batch went, and back to the stovetop I headed.

This time, I let the mixture boil on medium-low heat and, and while it took much longer for the mixture to come to temperature, I had no scorching or burnt edges. After pouring it out, spread it quickly, before it begins to set.

I like mine thin, so I spread it on a large parchment sheet. So thin in places that the mat would show through. After it set for a little bit, but was still warm, I sprinkled chocolate chips on top and let them sit until mostly melted. Then I just spread the melted chocolate on top of the toffee.

The fun part is after it all cools, you get to just break it apart. No muss, no fuss. I figured now would be a good time for quality control, and I was thrilled with the results. The toffee was sweet and buttery, and broke apart but still had a melt-in-your-mouth quality about it. The chocolate just sent it over the top. I love it, too , because it has so few ingredients, and they are ingredients I always have lying around in my pantry. Nothing exotic, just simple, delicious and decadent. Works for me!


English Toffee
From
Paula Deen via the Food Network

Ingredients
14 tablespoons (1 stick, plus 6 tablespoons) butter
1 cup sugar
2 tablespoons cold water
1/2 cup chopped pecans (I omitted in my recipe)
1 teaspoon pure vanilla extract
Dash salt
1 (6-ounce) bag semisweet chocolate chips or thin chocolate bars
Directions
Generously butter a cookie sheet.

Directions
Put butter, sugar, and water in a heavy pan or skillet over medium-high heat.

Bring to a bubbling boil, stirring constantly with a wooden spoon, about 10 minutes. Remove spoon from pan, and cook to a very brittle stage (300 degrees to 310 degrees F on a candy thermometer). Or, make a cold water test: candy will separate into hard, brittle threads when dropped in cold water.

Remove from heat and add nuts to mixture. Add vanilla and salt. Pour onto prepared cookie sheet and spread to 1/4-inch thickness.

Cool slightly, top with chocolate chips or chocolate bars, and spread as it melts. Cool completely and break into pieces. Store in an airtight container.

Linked up to:


Saturday, January 22, 2011

Spinach and Bacon Mac N Cheese

Holy Cow, I'm at my 100th post! Is it just me, or is that exciting? I figured for this occasion, I'd share a classic comfort food, jazzed up and blinged out. Ok, no bling, but this is definitely a nice spin on a classic macaroni and cheese.

Mac and Cheese night at our house is either a really good thing or a really bad thing. The past few attempts have yielded one of two results – a cheese sauce that otherwise tasted fine but curdled because I used fat free half-and-half, or a beautiful sauce and not-so-good flavors.

We have a restaurant by us that has a ‘make your own mac and cheese’ menu, where you can choose your add-ins, and it is mixed up fresh for you. My husband and I compromised between his highly carnivorous diet and my more omnivorous one and ordered mac and cheese with bacon and spinach. It was so good - creamy and velvety, with just the right hit of saltiness to cut through the richness of the cheese. I hoped that one day I could make macaroni and cheese that was this good. Unfortunately for me, the odds aren’t really in my favor when it comes to this American classic.

It wasn’t until a few nights ago that the hubby and I were trying to decide what to make for dinner, and I suggested macaroni and cheese. After what I think may have been a small nervous twitch in his eye, he actually agreed. I saw this recipe a while ago, put it in my ‘to make’ binder and forgot about it. While flipping through my recipes, the combination of the spinach and smoked gouda caught my eye. I realized that with the addition of some bacon, it would be very similar to the dish we enjoyed so much at the restaurant.

As fearful as I was about screwing up, this recipe seemed almost foolproof. This time, the roux worked beautifully, the sauce thickened up as expected and the flavors of this mac and cheese were out of this world. The spinach added a little bite to the recipe, and I used baby spinach so that the bitterness wasn’t too overwhelming, but was sturdy enough to stand up to the richness of the cheese sauce.

And how did it compare to the original version? My husband said it was a hundred times better than what we got at the restaurant.

What a sweetheart. He’s definitely a keeper!


Spinach and Bacon Mac N Cheese
Adapted slightly from
Culinary in the Desert

Ingredients
1/2 c bread crumbs
1/4 cup thinly sliced green onions
2 garlic cloves, minced
2 tablespoons all-purpose flour
2 cups fat-free milk
1/2 teaspoon salt
1/4 teaspoon black pepper
1/2 cup (2 ounces) shredded smoked Gouda cheese
1/3 cup (about 1 1/2 ounces) grated fresh Parmesan cheese
Three strips of thick cut bacon, chopped
5 cups coarsely chopped fresh spinach
4 cups hot cooked elbow macaroni (about 2 cups uncooked)
Tabasco Sauce

Directions
Preheat oven to 350

Dice bacon into small pieces, cook in large saucepan until crispy. Scoop bacon out of pan with slotted spoon onto paper towels and set aside.
Keep saucepan (with the rendered bacon fat) over medium heat. Add onions and garlic; cook 1 minute. Add flour; cook 1 minute, stirring constantly. Gradually add milk, salt, and pepper, stirring constantly with a whisk until blended. Bring to a boil; cook until thick (about 2 minutes). Add cheeses; stir until melted. Add spinach, bacon and macaroni to cheese sauce, stirring until well blended.

Spoon mixture into a 2-quart baking dish coated with cooking spray. Sprinkle with breadcrumbs. Bake at 350° for 15 minutes or until bubbly. Garnish with Tabasco sauce, if desired.
4 servings

Tuesday, January 18, 2011

Homestyle Chicken Noodle Soup

Bob Evans used to be one of my favorite places to get chicken noodle soup, mainly because their soup had ‘dumpling noodles’ that I love so much. Imagine my utter disappointment when I went to Bob Evans with my family and there was no chicken noodle soup on the menu! Oh, the horror!

I have no idea why, but that soup has always been the standard by which I compare all other chicken noodle soups. Sure, the Lipton brand chicken soup with noodles was fun to suck up with a straw, but nothing can compare to delicious, dense, hearty noodles, which are apparently difficult to find in canned soup nowadays.

I saw this noodle recipe on Dine and Dish recently, and knew I had to try it. The soup base was a basic chicken stock with some veggies thrown in for good measure, but the star of this soup was the noodles. It was so much fun to make these, and I was absolutely delighted when I took my first bite. The noodles reminded me of a fat piece of pasta, which provided a nice substance to this soup. Because of the noodles, this soup was easily a meal, not a side dish.

The noodles are so easy, you won’t believe it. Mix, knead, roll, cut, boil. I can’t wait to make these again!
Homestyle Chicken Noodle Soup
From my kitchen
Serves 4-6

Ingredients
1 approximately 6 lb whole chicken
Enough water to cover chicken in pot
Carrots, chopped (use your judgement, but I believe we used about 4 carrots)
Celery, chopped (see above, I think we used about 3 stalks of celery)
Five cloves of garlic, finely minced
~1 c Corn (you can use fresh, but I used frozen because that’s what we had on hand)
2 Bay leaves
2 tsp Poultry seasoning
Dash Salt
Dash pepper

Rinse your chicken and put in large stew pot. Put just enough water in the pot to cover chicken with about one-quarter to one-half inch of water. Add bay leaves. Bring water to simmer (not boiling!), and let simmer, covered, for two to three hours, or until chicken is cooked through. Begin testing the chicken at two hours by trying to break the meat apart with a fork. If it shreds easily, it’s done. If you get some resistance, put the lid back on and let sit another 30 minutes before trying again.

Removed chicken from pot and let cool slightly. Get the meat off the chicken and chop up whatever you want to end up in the soup. For mine, I ended up reserving an entire breast off the chicken for later use, and the rest of the meat went into the soup, light and dark. Set aside.

Strain any fat that has floated up to the surface of the stock. We ended up getting approximately a half-cup off, but were surprised how little fat was in ours. You may have more or less depending on your chicken. Remove bay leaves.

Add poultry seasoning, carrots, garlic and celery to stock. Let simmer for 30 minutes, or until veggies are soft. Taste and season as necessary with salt and pepper. While veggies are simmering, begin making your noodles.
For the Noodles
Noodle recipe from
Dine and Dish

Ingredients
Eggs
1 Tsp Salt
Flour

This is where you can customize the recipe for how large or small of a group you are serving. For every 1/2 cup of flour you will need 1 egg. So, to serve my family of 6, I use 4 eggs and 2 cups of flour. (I used 3 eggs and 1.5 cups of flour for 4 people, and it seemed like a lot! Next time I’ll probably use 2 eggs and 1 cup of flour)

In a medium sized bowl, whisk your eggs. Add the salt and whisk again. Next, add the flour. Stir the mixture with a fork until flour is completely incorporated and the dough is stiff.

Flour a large bread board / cutting board heavily. Dump your dough mixture out onto the floured board. Knead additional flour into the dough. Unlike pie crust (you don’t want to work pie crust too much) you want to continue to add flour to the dough until it is thick and smooth in texture. Just work with it and use your instincts.

Roll out the dough (again… make sure your board is well floured so your noodles won’t stick) until very thin. Once your dough is rolled out, using a pizza cutter, slice your dough into thin vertical strips. Make a couple of slices horizontally until your noodles are a desired size.

Return your pot of broth and water to a boil. Once boiling, add your noodles to the pot, one at a time, stirring so they don’t stick together(I pretty much dumped all mine in at once). Once all of your noodles are in the pot, reduce the heat, add your chicken pieces back to the pot and simmer for 30 minutes. Add in corn, simmer 5 more minutes.

Serve and enjoy! Garnish with a little parsley if desired.

Friday, January 14, 2011

Bao Buns - Part II

I’ve posted a char siu bao (Chinese BBQ pork bun) recipe on here previously, but I was less-than-ecstatic with the results when I opened the steamer. It appeared that my dough didn’t rise, which should have been a clue to start over, but I soldiered on. The end result was more of a dumpling than a bun and while it was salvaged because the filling was so delicious, it fell painfully short of what I had hoped they would be.

After watching an episode of Top Chef where they had to make dim sum for the lunch rush in Chinatown, I had a strong desire to try my hand at the bao buns again.

Armed with a new recipe (and live yeast!) I started making the sponge for my bao. This had to sit for 30 minutes before incorporating the other ingredients, which also gave me the chance to see proof that my yeast was alive. All excited, I misread the recipe and put a cup, yes a CUP of vegetable oil into the sponge – the recipe only calls for a tablespoon. I am not sure how I misread that, even after double-checking, but when I had an oily mess on my hands, I knew something was wrong. After reading the recipe, I sheepishly had to tell my hubby that we might be eating a little later than anticipated, since I had to start from scratch. Oh well, it happens.

Second time around, I started my sponge, measured out one tablespoon of melted lard this time (in keeping with the recipe) and had a beautiful dough. I ended up needing less than a half cup of water to bring the dough together, so add slowly. As the recipe says, don’t overhydrate your dough.


The interesting part of this recipe was that a teaspoon of baking powder is kneaded directly into the dough after its first rise. This was definitely not in the first recipe I attempted. I took that to be a good sign.

After filling the buns and letting them sit for another 15 minutes or so, I got the steamer ready.

I put three buns on the top steamer basket, leaving the bottom one empty (as suggested by the original poster of the recipe). 11 minutes later, I took the lid off of my steamer basket and squealed with delight that I had made bao!

The buns were fantastic, and the dough was soft and airy, but still substantial. Oh man, I am so excited to make these again.


I used a specific bao flour I found in Chinatown, but I am not sure I’ll need to purchase it every time I make bao – the original recipe suggested using a combination of AP flour and cake flour (since cake flour has a lower protein content). I will probably make them using that combination when I run out of my bao flour.

Now that I have finally found a dough recipe that works, I can’t wait to experiment with fillings! Any suggestions?


Plain Chinese Steamed Buns
(Makes 12 buns)
Published on and copyrighted by shesimmers.com
(My comments are in italics and these are mostly paraphrasing tips and suggestions on the Shesimmers website.)

Sponge Starter:
1/3 cup lukewarm water
1/3 cup all-purpose flour
1 tablespoon active dry yeast
2 teaspoon sugar

Dough:
1 1/2 cups all-purpose flour (for lighter texture use 3/4 cup all-purpose flour plus 3/4 cup cake flour)
2 teaspoons baking powder, divided
1/2 teaspoon salt
2 1/2 tablespoons sugar
1 tablespoon of vegetable oil (or melted lard or vegetable shortening)
Enough lukewarm water to create a smooth dough, approximately 1/2 cup

Filling - see original post for filling recipe.

You'll also need:
A steamer - Note: Shesimmers mentioned a preference for the metal steamers, I used my bamboo one just fine, but I only used the top rack and steamed three buns at a time
12 3"x3" waxed paper square


In a large mixing bowl, mix together all the sponge ingredients and let it stand about 30 minutes (up to 2 hours)

Once the sponge is ready (it should puff up and have holes on the surface), add the flour, 1 teaspoon of baking powder, salt, sugar, and oil to the sponge bowl.

While your dominant hand is stirring the dough, add lukewarm water to the mixture a little bit at a time with your non-dominant hand. (Do I have to be this specific about the hand thing?) The moment you feel you can get a smooth dough that wipes the bowl almost clean, stop adding water.

Knead the dough right in the bowl, if you don't want to clean your kitchen counter afterwards. But if you need room to groove, feel free to dump the dough onto a large surface and let go of all your kneading inhibitions.

Once you have a smooth, satiny dough (after about 3-4 minutes), put the dough back into the mixing bowl, if you took it out, and cover tightly with a piece of plastic wrap. Let it rise for 3 hours in a warm spot.

You have three hours to get ready, so prepare your steamer and make the waxed paper squares.

After three hours, sprinkle the remaining 1 teaspoon of baking powder all over the surface of the dough and knead it in, lightly but well.

Roll the dough into a long log and cut into 12 equal pieces. If you are steaming plain buns, shape each piece into a ball by pinching and stretching. Place each dough ball, seams-side down, on a piece of waxed paper.

If you plan on filling the buns, after dividing the dough, flatten each piece into a circle approximately 4 inches in diameter. Add about two tablespoons of filling, pinch circle closed around filling. Place each filled ball seam side down on waxed paper.

Cover the buns with a kitchen towel and let them rise once more for 30 minutes to an hour. You know the buns are ready when they have puffed up and the tops look smooth and taut.

Gently lower the buns into the steamer using the corners of the wax/parchment paper squares, positioning them in such a way that allows for expansion. They should not touch each other or the sides of the steamer.

Steam the buns for 10 minutes. Remove the buns from the steamer and let them cool under a kitchen towel.


Tuesday, January 11, 2011

Resolutions (and Chocolate-Cherry Cheesecake!)

Now that we’ve eased our way somewhat into 2011, I have a confession to make: I am not huge on making resolutions for the new year. It’s not that I don’t like to set personal goals for myself, I actually do that quite often, but I like to set them on my schedule, not just because we’re supposed to.

When I make an arbitrary goal ‘just because that’s what everyone else does for the new year’ I have very little incentive to stick with it, which inevitably sets myself up for failure. Also, based on previous resolutions from years past, another problem with my goal-setting process is that I set one large, intimidating goal instead of small, attainable goals.

So this year, instead of making on lofty resolution, I’m going to try to make smaller, attainable ones. Hopefully by sharing them here, I’ll feel slightly more accountable to myself.

For my health, I promise to…

- get moving at least three times a week, either by walking/running on the treadmill, using my exercise band, using my exercise ball, or playing with the dog

- incorporate at least 80% of the food color ‘rainbow’ into my daily diet, focusing on the three groups typically missing – red, yellow/white and blue/purple.

- focus on better choices when out to eat – get a salad instead of fries, even if it costs 99-cents extra.

- buy healthier snacks instead of chips and cookies to have available when hunger hits.

- eat when I’m hungry, not when bored. If I think I’m hungry, drink 8 oz of water or green tea first, wait, and then eat.

- not deprive myself of sweets and goodies I truly crave versus mindlessly eating junk food just because it’s there. For the most part, I want to have everything in moderation, including sweets, fats, salt and alcohol! (Though I’m sure there will still be the occasional over-indulgence!)

For my blog, I promise to:

- work on improve my photography skills – even if that only means trying to take pictures during daylight hours to reduce my reliance on a flash.

- try fondant on a cake at least once (if I’m really ambitious, homemade marshmallow fondant!)

- practice my decorating skills on sugar cookies with royal icing

- attempt a giveaway of some sort. I may not have a lot of readers or followers, but I appreciate the ones that I have and would like to give something back!


I figure I’ll start with the easiest one first – not depriving myself of the things I love, just having them in moderation. Let me tell you, this cheesecake was difficult to stop eating. It was was creamy and smooth, and the sweet/sour of the cherry filling provided just the right amount of tartness to compliment the chocolate and cheesecake filling. The filling itself isn’t overly-sweet, which is good, because the chocolate ganache topping is so decadent. Be sure to make this cheesecake the day before you want to eat it. We liked it well enough on the day it was made, but we all agreed that 24 hours later, the cheesecake was even better. The best thing about cheesecakes as desserts is that you can freeze the uneaten portion to save for a later date. Then I don’t feel obligated to eat it just because it might go bad sitting in the fridge.

I have yet to figure out how to get a good photograph of a cheesecake. They are so darn difficult to cut cleanly!

Oh well, still tastes great even if it isn’t all that pretty.


Chocolate-Cherry Cheesecake
From Pillsbury

Prep Time: 35 Minutes
Start to Finish: 5 Hours 50 Minutes

Crust
2 cups chocolate cookie crumbs
3 tablespoons butter, melted

Filling
4 packages (8 oz each) cream cheese, softened
3 eggs
3/4 cup sugar
1/2 teaspoon almond extract
1/2 cup whipping cream
1 can (21 oz) cherry pie filling (I used the one with extra fruit)

Glaze
1/2 cup whipping cream
1 cup semisweet chocolate chips (6 oz)

Heat oven to 325°F. In medium bowl, mix crust ingredients. Press in bottom and 1 inch up sides of ungreased 10-inch springform pan. Wrap springform pan in three layers of heavy-duty foil.

In large bowl, beat cream cheese with electric mixer on medium speed until smooth. Add 1 egg at a time, beating well after each addition. Beat in sugar and almond extract until smooth. Add 1/2 cup whipping cream; blend well.

Spoon 3 1/2 cups cream cheese mixture into crust-lined pan, spreading evenly. Carefully spoon 1 cup pie filling evenly over cream cheese layer (reserve remaining pie filling for topping). Spoon remaining cream cheese mixture evenly over pie filling.

Bake in water bath for 1 hour 5 minutes to 1 hour 15 minutes or until center is mostly set but still slightly wiggles. Cool in oven with door closed for 30 minutes. Remove pan from oven and cool on cooling rack 1 hour.

In 1-quart saucepan, heat 1/2 cup whipping cream to boiling over medium-high heat. Remove from heat. Stir in chocolate chips until melted.

Line cookie sheet with waxed paper. Remove side of pan. Place cheesecake on paper-lined cookie sheet. Spread glaze over cooled cheesecake, allowing some to flow down side. Refrigerate at least 3 hours or overnight. Serve topped with remaining pie filling.

Linked to:

Sunday, January 9, 2011

Red Velvet Cupcake

This post is in response to a specific request for a red velvet recipe - I'm always glad to do what I can!

I wish I could tell you I knew what red velvet cake was actually supposed to taste like. It does have cocoa in it, so there is a slight chocolate flavor, but there isn’t enough to make it a ‘chocolate’ cake, and it’s definitely not a white or yellow cake – so what is it? No clue.

All I know is that, in my opinion, I’ve had really great ones, and really terrible ones. The good ones are moist and tender, with a uniform crumb texture and a good ratio of icing to cake – typically a cream cheese icing. The not-so-good ones were so dry that as soon as I took a bite, it felt like I had cotton mouth, and it was difficult to chew and swallow the cake. The icing was cloyingly sweet, and there was way too much of it on the cake – maybe in an attempt to compensate for the lackluster cake underneath? In both cases, I’ve had some that are just barely red, where the cocoa color was more prevalent, and some that looked like they were going to bleed out as soon as you took a bite. I have never made red velvet before, but figured a recipe with some decent reviews and feedback would be a good place to start.

I love how pretty the cupcakes are – bright red cake, stark white frosting. They really do have the “POW!” factor. They were moist and flavorful, hurting both notes of cocoa and tangy buttermilk.

Nothing will ever replace a classic chocolate cupcake with white frosting in my heart, but I think I can certainly make some space for red velvet as well!


Grandmother Paula's Red Velvet Cake
Adapted slightly from Paula Deen via FoodNetwork.com
Makes about 27 cupcakes

Cake:
2 cups sugar
1/2 pound (2 sticks) butter, at room temperature
2 eggs
2 tablespoons cocoa powder
1 ounces red food coloring
2 1/2 cups cake flour
1 teaspoon salt
1 cup buttermilk
1 teaspoon vanilla extract
1/2 teaspoon baking soda
1 tablespoon vinegar

Directions
Preheat oven to 350 degrees F.

In a mixing bowl, cream the sugar and butter, beat until light and fluffy. Add the eggs one at a time and mix well after each addition. Mix cocoa and food coloring together and then add to sugar mixture; mix well. Sift together flour and salt. Add flour mixture to the creamed mixture alternately with buttermilk. Blend in vanilla. In a small bowl, combine baking soda and vinegar and add to mixture. Pour batter into cupcake liners. Bake for 20 to 25 minutes, or until a toothpick inserted into the center comes out clean. Remove from heat and cool completely before frosting.

Vanilla Cream Cheese Frosting
From AllRecipes.com

1 (8 ounce) package cream cheese, softened
1/4 cup butter, softened
2 tablespoons sour cream
2 teaspoons Vanilla Extract
1 (16 ounce) box confectioners' sugar

Vanilla Cream Cheese Frosting: Beat cream cheese, softened, butter, sour cream and Vanilla Extract in large bowl until light and fluffy. Gradually beat in confectioners' sugar until smooth.

Tuesday, January 4, 2011

Cinnamon Rolls

As many times as I’ve made yeast dough, up until the morning I made these, I don’t recall ever making cinnamon rolls. I have wanted to try making them for a long time, but it is hard to justify a whole batch of rolls for two people. My parents coming to visit for a weekend gave me the push to try. While I had thought of trying an overnight cinnamon roll recipe, I couldn’t pry myself away from our exciting card games to make the dough. I figured that spending time with my family was more important that cinnamon rolls, so I figured we’d just go out to breakfast the next morning or eat cereal or pancakes.
Luckily for me, however, our little puppy starts waking up for the day around 6:30 am. I actually love having our puppy as my alarm clock on the weekends because I can wake up and get my day started and it’s a great time to spend some time with the puppy without him being too hyper. I played with him a little bit, and then Cody decided he’d much rather lay on his mat and chew his bone than play with me. With a couple hours to kill before everyone else started waking up, I figured this would be a perfect time to make my cinnamon rolls.
The process was pretty simple, but still managed to misread the instructions the first time around. Thankfully, the recipe is forgiving. After having the wet and dry ingredients mixed, I realized I’d forgotten 2/3 cup of milk. So I just dumped it in and mixed until it was combined. Easy peasy. I blame that one on the fact my coffee hadn’t kicked in yet.
The other problem with making yeast dough so early in the morning is that because I didn’t want to disturb everyone with the whirr of my stand mixer, the only tools I used were my metal mixing bowl, a wooden spoon, and my hands. I love my stand mixer, but I forget how relaxing kneading dough by hand can be. There is something really fascinating about how the texture changes in the dough as you keep kneading it.
And please, for the love of pete, don’t be like me and let butter and sugar bubble over the edge of your dish and burn onto the bottom of the stove. Put something underneath to catch any stray filling that may ooze out. (I will say that I finally had an excuse to test out the self-cleaning feature of my oven, and it was like the spill never happened, it was amazing!)


They were finally finished around 9:15-9:30ish. And while it was a little painful waiting that long to eat breakfast, it was definitely worth it. They were superb. Soft and slightly eggy, with a rich cinnamon-butter-brown sugar center oozing out. And no cinnamon roll is complete without some sort of frosting or glaze. I’m not a huge fan of a confectioners’ sugar glaze, so I used up the cream cheese in my fridge and made a cream cheese frosting.
As for storing them, I kept the icing and the rolls separate, since I knew we couldn’t finish the eight rolls between us in one morning. I figured they would reheat much easier without the icing. These do get a little hard after cooling, as many cinnamon rolls do, but I heated a leftover cinnamon bun for breakfast the next day, and after a minute in the microwave at 40% power, I could barely tell the difference between that one and the one fresh out of the oven the day before. I slathered it with some of the leftover icing, and it was pure heaven, for two mornings straight.


Cinnamon Rolls
From
Joy of Baking

Dough:

4 1/2 - 5 cups (630 - 700 grams) all-purpose flour
1 package (1/4 ounce) (7 grams) active dry yeast
1 cup (240 ml) milk
1/3 cup (75 grams) unsalted butter
1/3 cup (66 grams) granulated white sugar
1/2 teaspoon (2.5 grams) salt
3 large eggs

Filling:

3/4 cup (160 grams) packed light brown sugar
1/4 cup (35 grams) all-purpose flour
1 tablespoon ground cinnamon
1/2 cup (113 grams) unsalted butter, cold (cut into pieces)
1/2 cup light raisins (optional)
1 tablespoon half-and-half (light cream)

Cinnamon Rolls: In the bowl of your electric mixer, with the paddle attachment, combine 2 1/4 cups (315 grams) of the flour and the yeast.

In a small saucepan, stirring constantly, heat the milk, butter, sugar, and salt just till warm (120 -130 degrees F) (49 - 54 degrees C) and the butter is almost melted.

Gradually pour the milk mixture into the flour mixture, with the mixer on low speed. Add eggs, one at a time, beating after each addition. Scrape down the sides of the bowl. Beat this mixture on high speed for 3 minutes. Replace the paddle attachment with the dough hook (or do the kneading by hand), and knead in as much of the remaining 2 1/4 to 2 3/4 cups (315 - 385 grams) flour until you make a moderately soft dough that is smooth and elastic (3 to 5 minutes). (Dough will no longer be sticky to the touch.)

Shape into a ball. Place the dough into a greased bowl, turning once. Cover and let rise in a warm place till double (approximately 1 - 1 1/2 hours).

When the dough has doubled in size punch it down. Place onto a lightly floured surface, cover with a clean towel, and let rest for 10 minutes.


Meanwhile, combine the ingredients for the filling. In a medium-sized bowl place the brown sugar, flour, and cinnamon. Stir to combine. Cut in the cold butter with a pastry blender, or two knives, until the mixture is crumbly. Set aside.

After about 10 minutes, roll the dough into a 12 inch (30 cm) square. Sprinkle the filling evenly over the rolled out dough and top with raisins (if desired). Carefully roll the dough into a log and pinch the edges to seal. Slice the log (roll) into eight equal-sized pieces. Arrange dough pieces in a greased 13 x 9 x 2 inch (33 x 23 x 5 cm) baking pan.

Cover dough loosely with clear plastic wrap, leaving room for rolls to rise. At this point you can refrigerate the dough for anywhere from 2 to 24 hours. If overnight, the next morning remove the rolls from the refrigerator, take off the plastic wrap, and let stand at room temperature for 30 minutes. (If you are making the cinnamon rolls immediately, don?t chill dough. Instead, cover loosely with plastic wrap, and let dough rise in a warm place till nearly double, about 45 minutes to 1 hour.)

Break any surface bubbles with a toothpick. Brush dough with half-and-half or light cream. Bake in a 375 degrees F (190 degrees C) oven for 25 to 30 minutes or till light brown. (Can tell if done by inserting a toothpick into one of the buns, and it should come out clean. Also, if you lightly tap on the top of the buns it should sound hollow.)

If necessary, to prevent over-browning, cover rolls loosely with foil the last 5 to 10 minutes of baking. Remove rolls from oven. Brush again with half-and-half or light cream. Cool 5 minutes and then invert onto a baking rack and re-invert onto a serving plate or platter.

Can drizzle with the Powdered Sugar

Glaze.

Serve warm or at room temperature.

Makes 8 rolls.

Cream Cheese Icing

1 c confectioners' sugar
2/3 c cream cheese
3 Tbsp butter

Mix together until smooth. Smear onto warm buns.

Saturday, January 1, 2011

Feeding my “Swagoonchy” Craving (Recipe: Caramel Apple Crisp)

Happy New Year Everyone!!! I hope everyone had a wonderful time ringing in the new year!

Even though the holidays are over, the cold is still hanging around, most likely will until April. This is when I start wishing for the warmer weather, and that someone would shovel our sidewalk and driveway for us. It's days like this where I just feel like I need something that is, for lack of a better word, “swagoonchy.” For everyone that’s not inside my head, that would be sweet, warm, gooey, and crunchy. This caramel apple crisp satisfied this craving, and I’m sure if you were just craving something simple and delicious for dessert, this would work as well.

The combination of caramel, cinnamon, nutmeg and apples resembles an apple pie, but this is so much easier to make. And the ramekins help with portion control (because I’d be the one finishing an entire pan of this stuff). There is a little prep-work involved in the recipe, but I made this on a work night, so I know it can be done, even on a tight schedule.


Caramel Apple Crisp
2 Apples
8-10 caramel chews
2-3 Tbsp milk
1/4 tsp Nutmeg
1/2 tsp Cinnamon
3 Tbsp Oatmeal
1 Tbsp Butter
1 Tbsp Brown sugar

Preheat oven to 325.

In a small pot, combine milk and caramels over low heat until caramels have melted and mixed with the milk. (Alternatively, you could also do this in the microwave, at full power for 30 seconds, stir and repeat until combined.)

In another bowl, slice the apples, fairly thin. Pour in the caramel/milk mixture and stir to coat.

In a separate bowl, combine oats, brown sugar, cinnamon, nutmeg and butter. Mix until well combined.

Put apple mixture into ramekins, and top with the oatmeal/butter mixture.

Bake for 20-30 minutes, or until toasted on top and bubbly.
Related Posts Plugin for WordPress, Blogger...